SpringBoot + Vue前后端分离项目实战 |
您所在的位置:网站首页 › springcloud vue前后端分离方案 › SpringBoot + Vue前后端分离项目实战 |
SpringBoot + Vue前后端分离项目实战
|
文章目录
环境配置开发工具下载Vue前端模板前端项目启动前端说明及修改修改导航栏自定义菜单与子菜单增加导航标签功能
前端数据格式
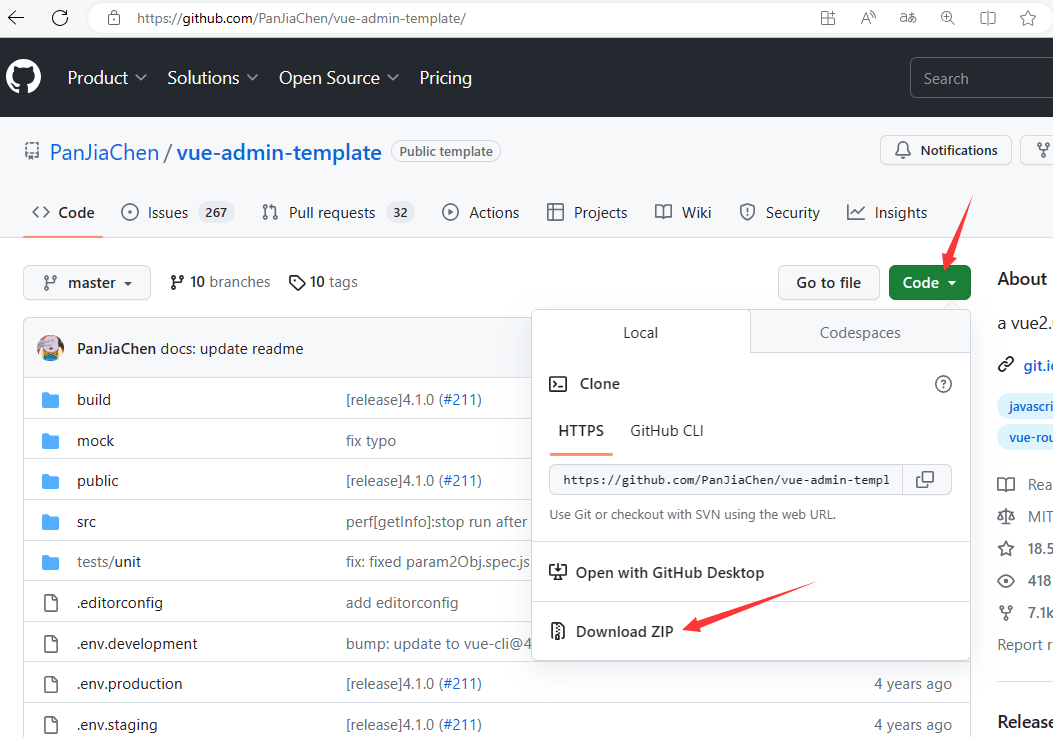
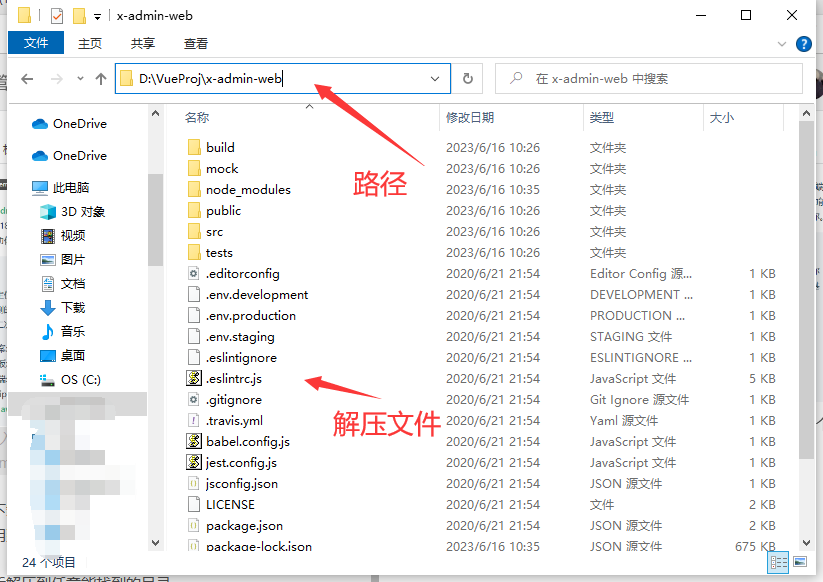
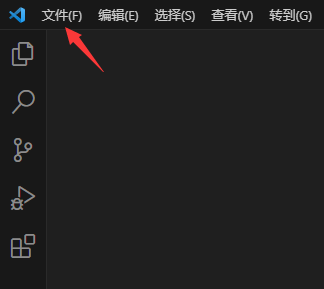
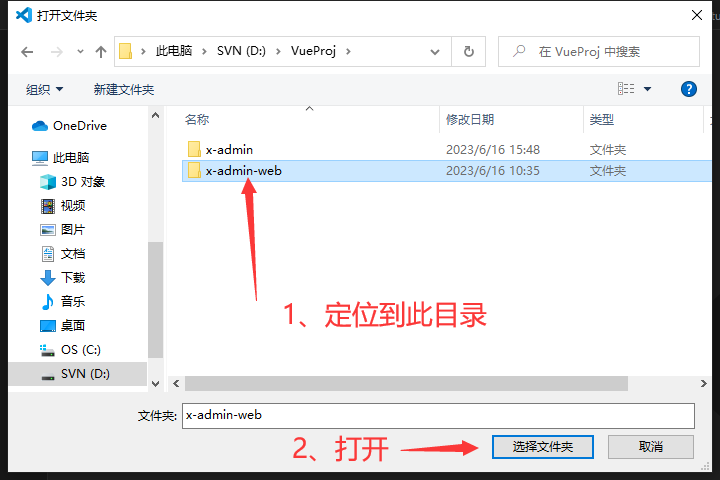
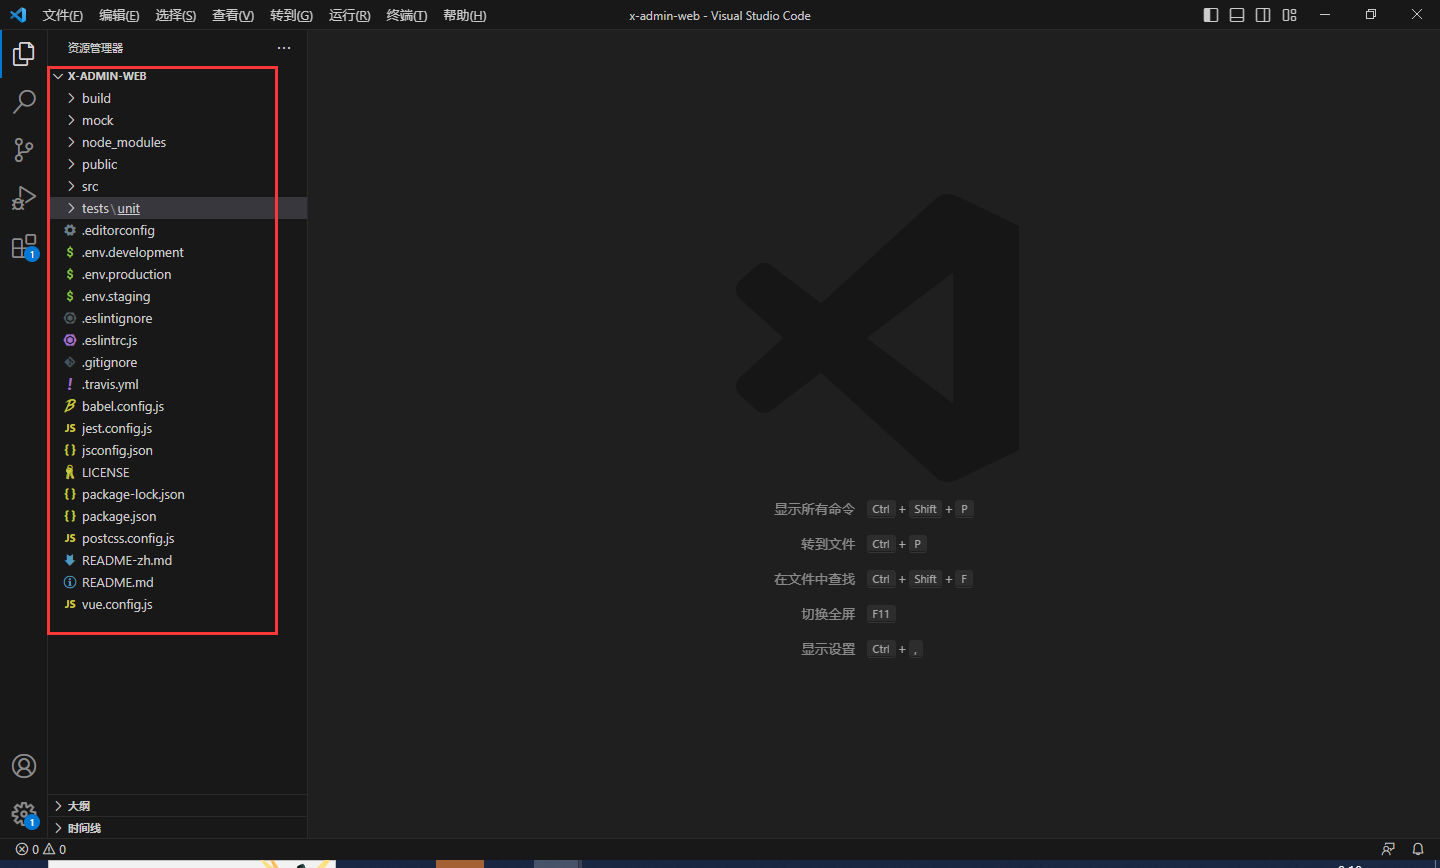
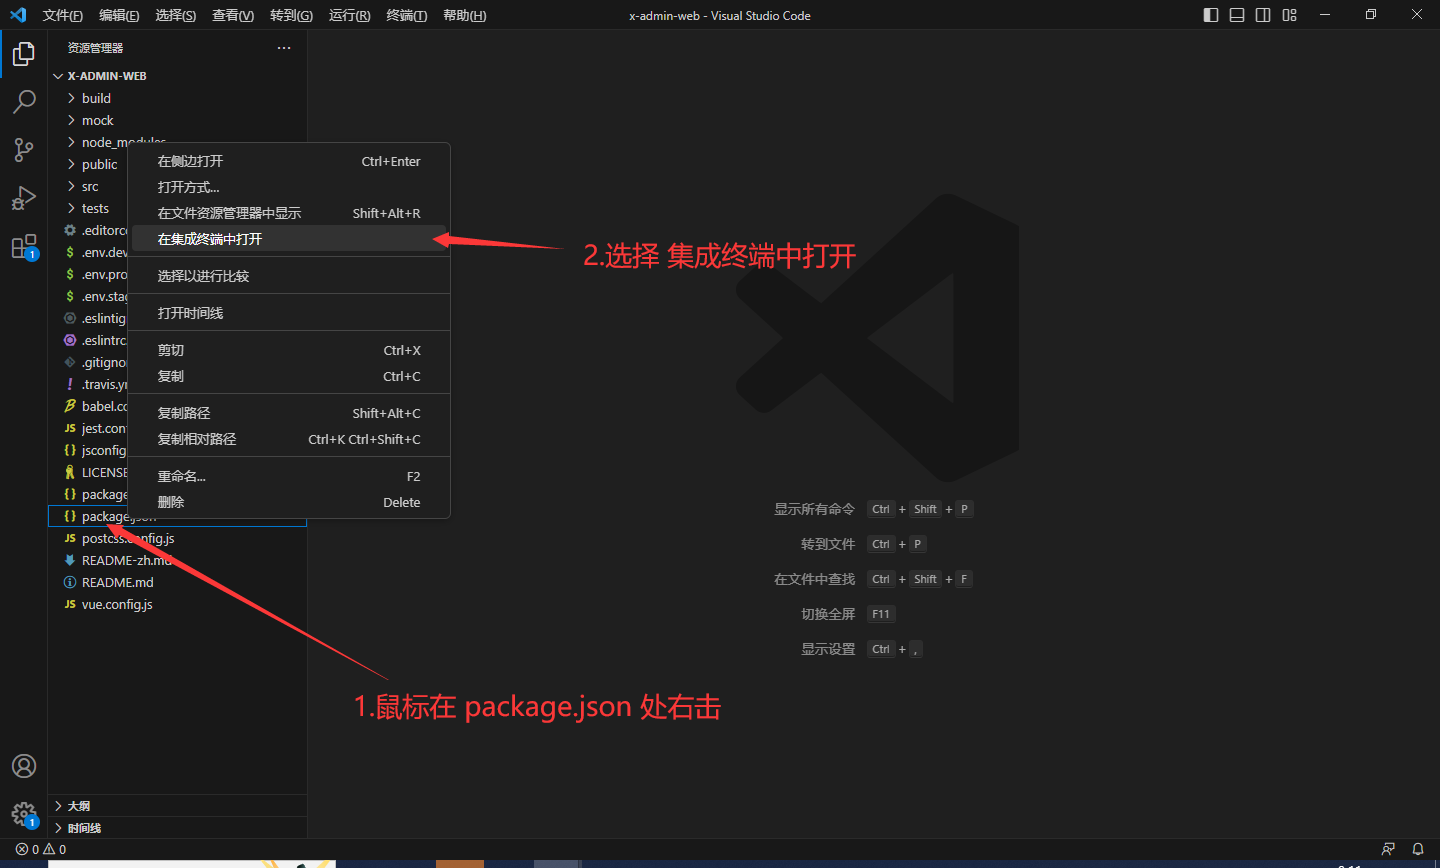
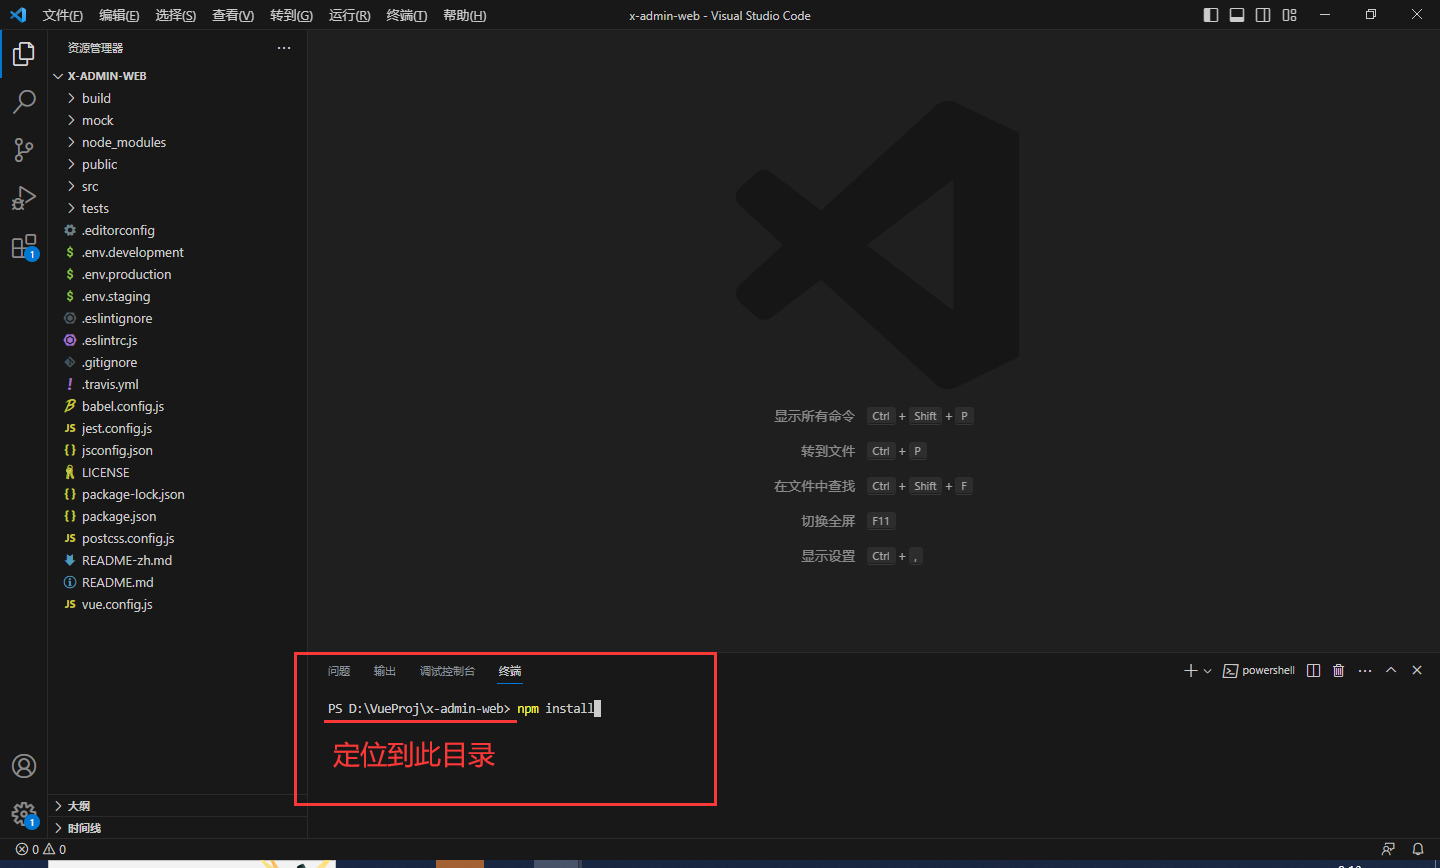
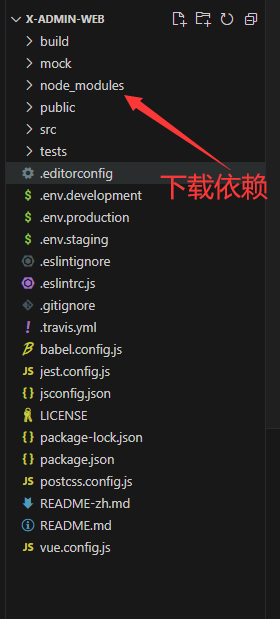
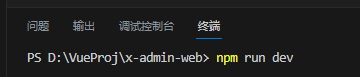
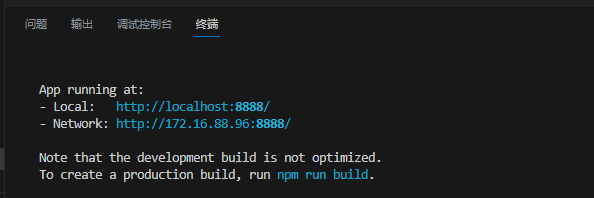
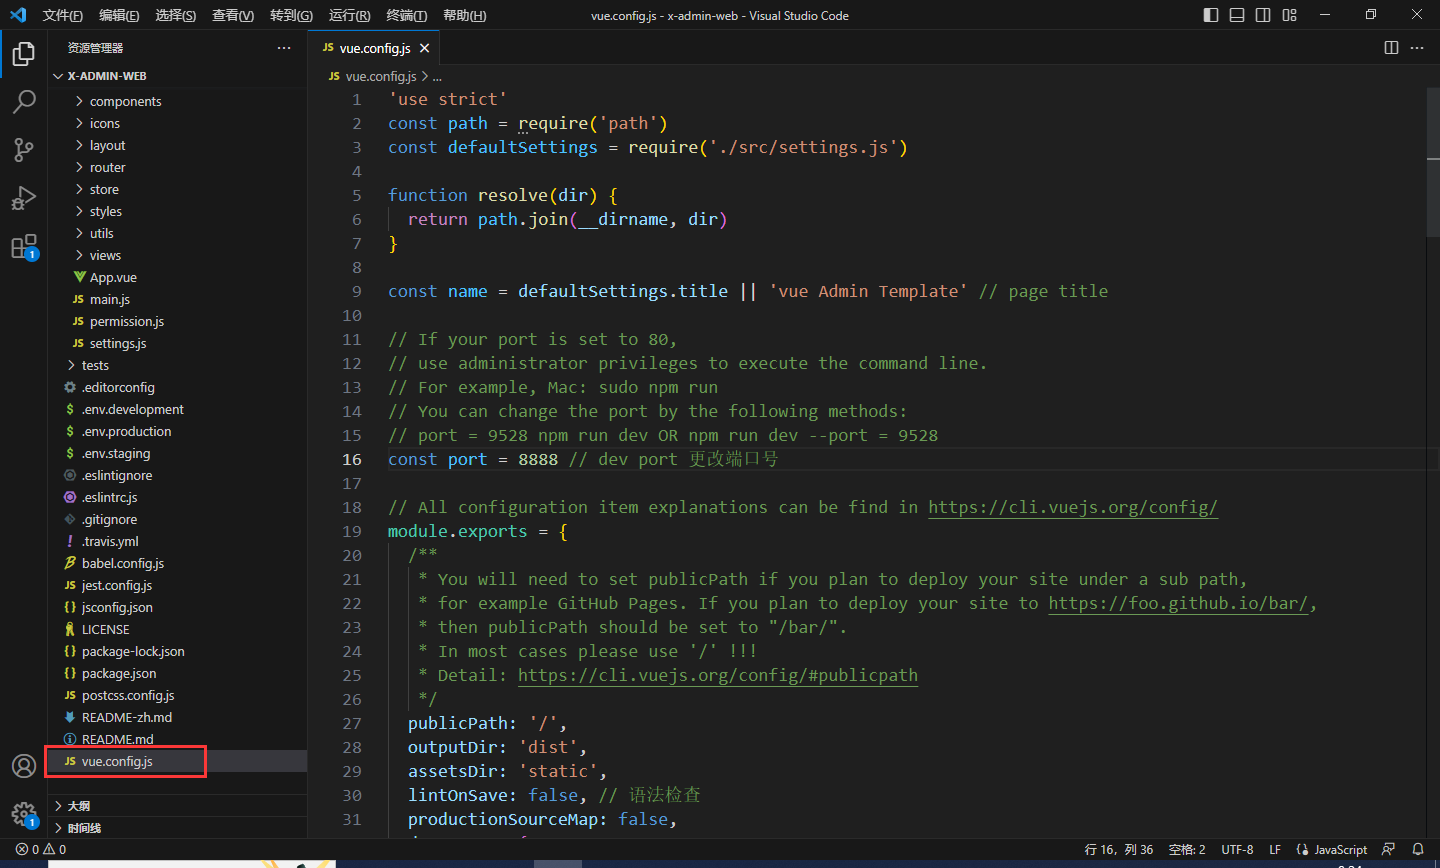
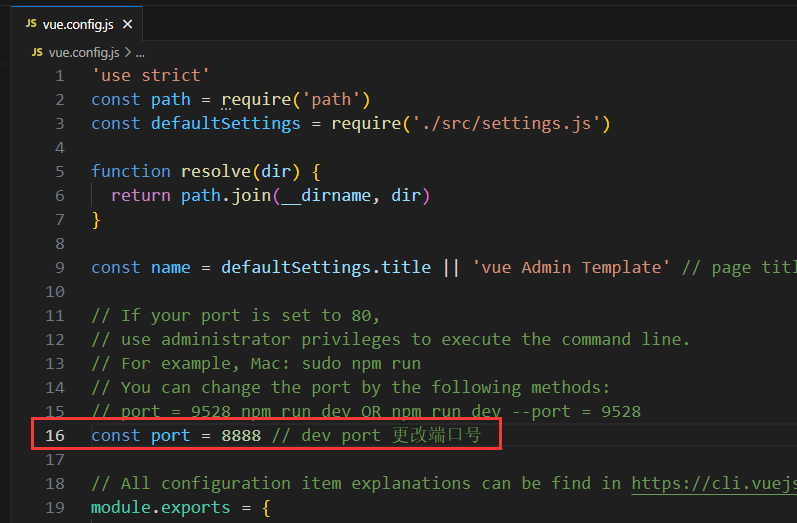
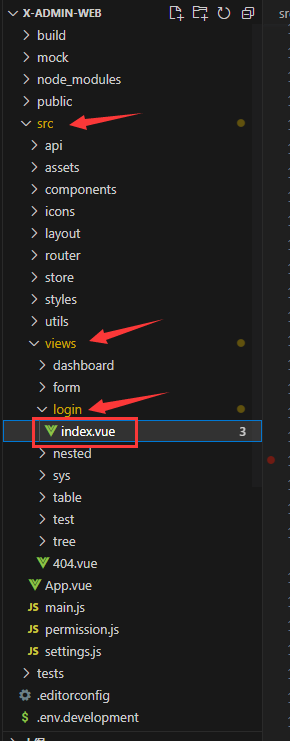
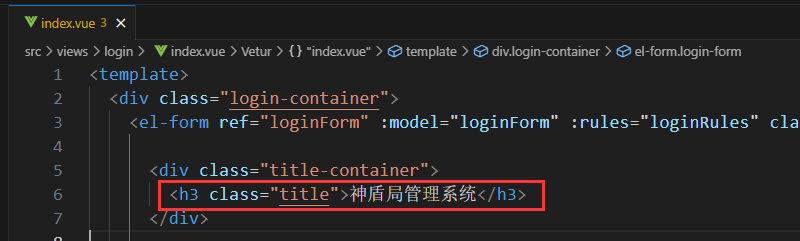
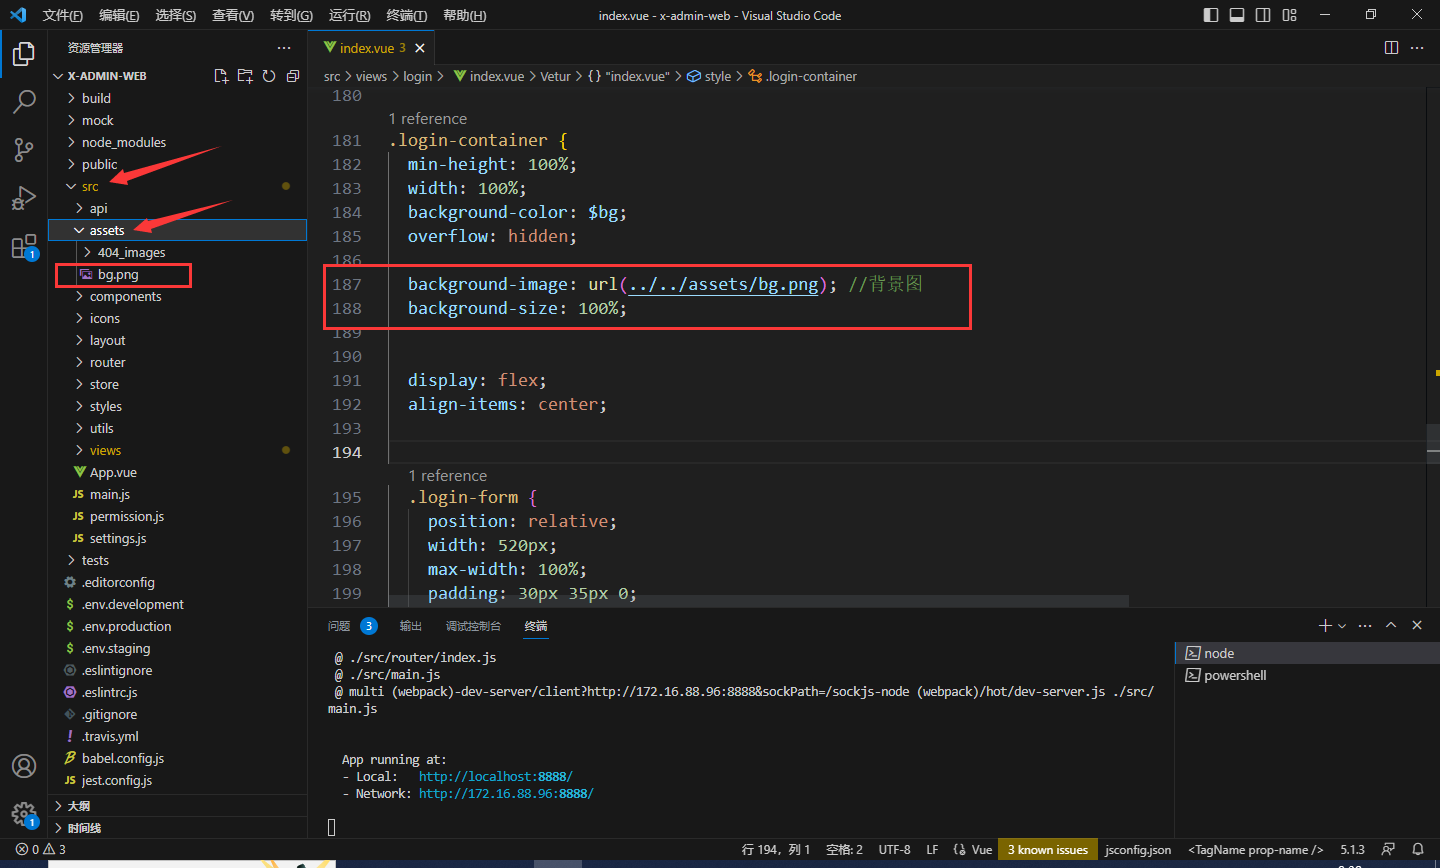
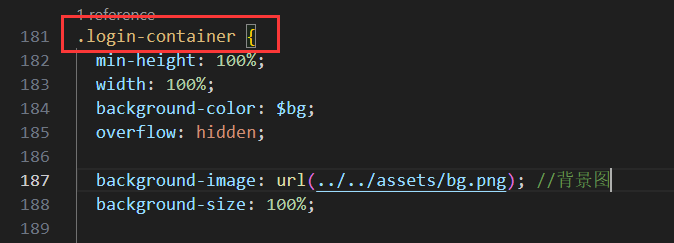
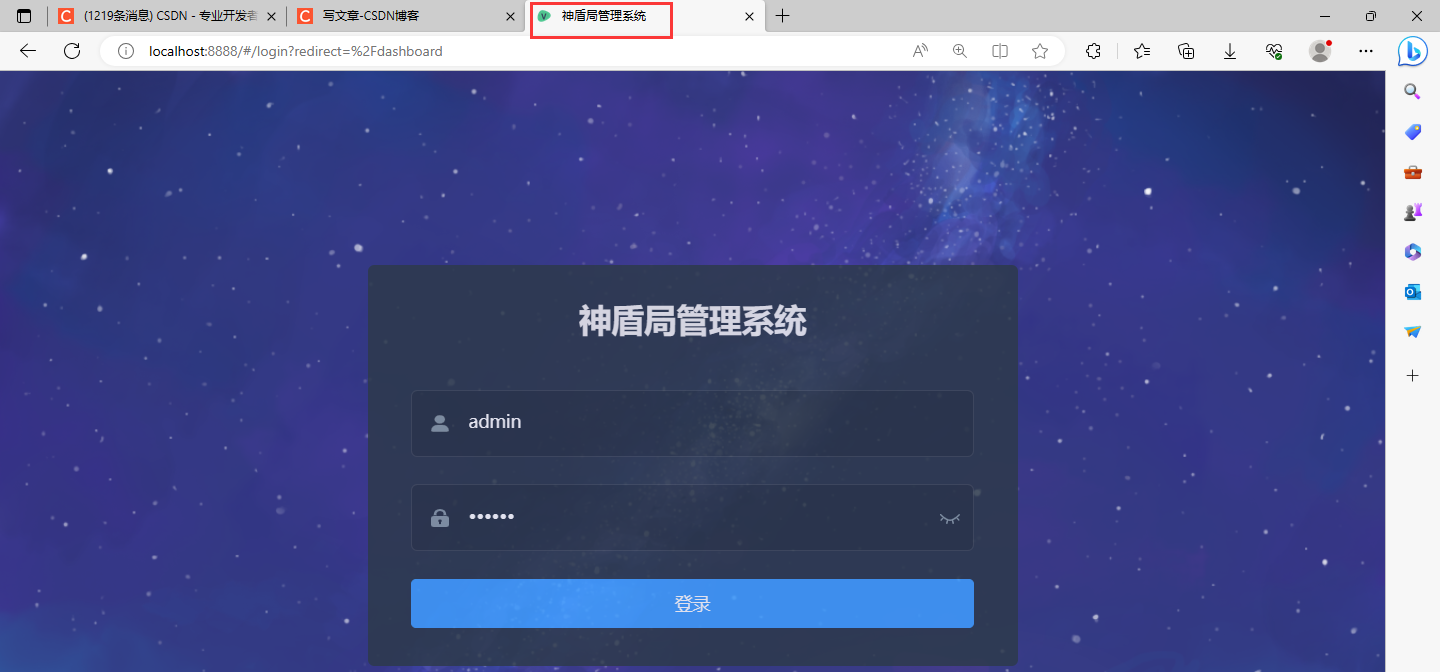
B站视频讲解:2023全网最简单但实用的SpringBoot+Vue前后端分离项目实战 不想看视频可浏览此文章笔记,比较详细 环境配置Nodejs: 8.17.0 Vue: 3.11.0 Maven: 3.6.0 Java版本: 1.8.0_371 MySQL: 5.5_56 Redis: 5.0.14 一般推荐使用低版本,因为高版本兼容低版本,反之不行 开发工具IDEA 2021(后端) VScode(前端) 下载Vue前端模板https://panjiachen.gitee.io/vue-element-admin-site/zh/guide/ 选择2后,可下载其他版本,此处我下载的是v3.0.0 下载完成后将第2个基础模版解压到任意能找到的目录(不推荐目录中包含中文字符) 打开VScode,选择 文件 -> 打开文件夹 如下图 打开成功 打开集成终端,一定要定位到package.json级别的目录 然后终端输入命令 npm install 会自动下载项目的依赖 依赖下载完毕后 启动项目,运行命令npm run dev 出现以下信息表示成功 前端的总体配置在文件vue.config.js中 第16行 是端口号,可修改,此处我修改为8888 第34行 为是否启动项目就默认打开浏览器,因为vue支持热修改,并不用每次改完前端就需要重新启动,改完保存后前端页面就自动修改,所以此处设为false 所有的页面保存在src/views文件夹中,此处的view文件夹被我修改过,稍后说明修改流程 先修改登录页面src/views/login/index.vue 定位到第6行,修改title 定位到 187行,修改背景图,此时你需要找到一张背景图片,放在src/assets文件夹中 background-image: url(../../assets/bg.png); //背景图 background-size: 100%;
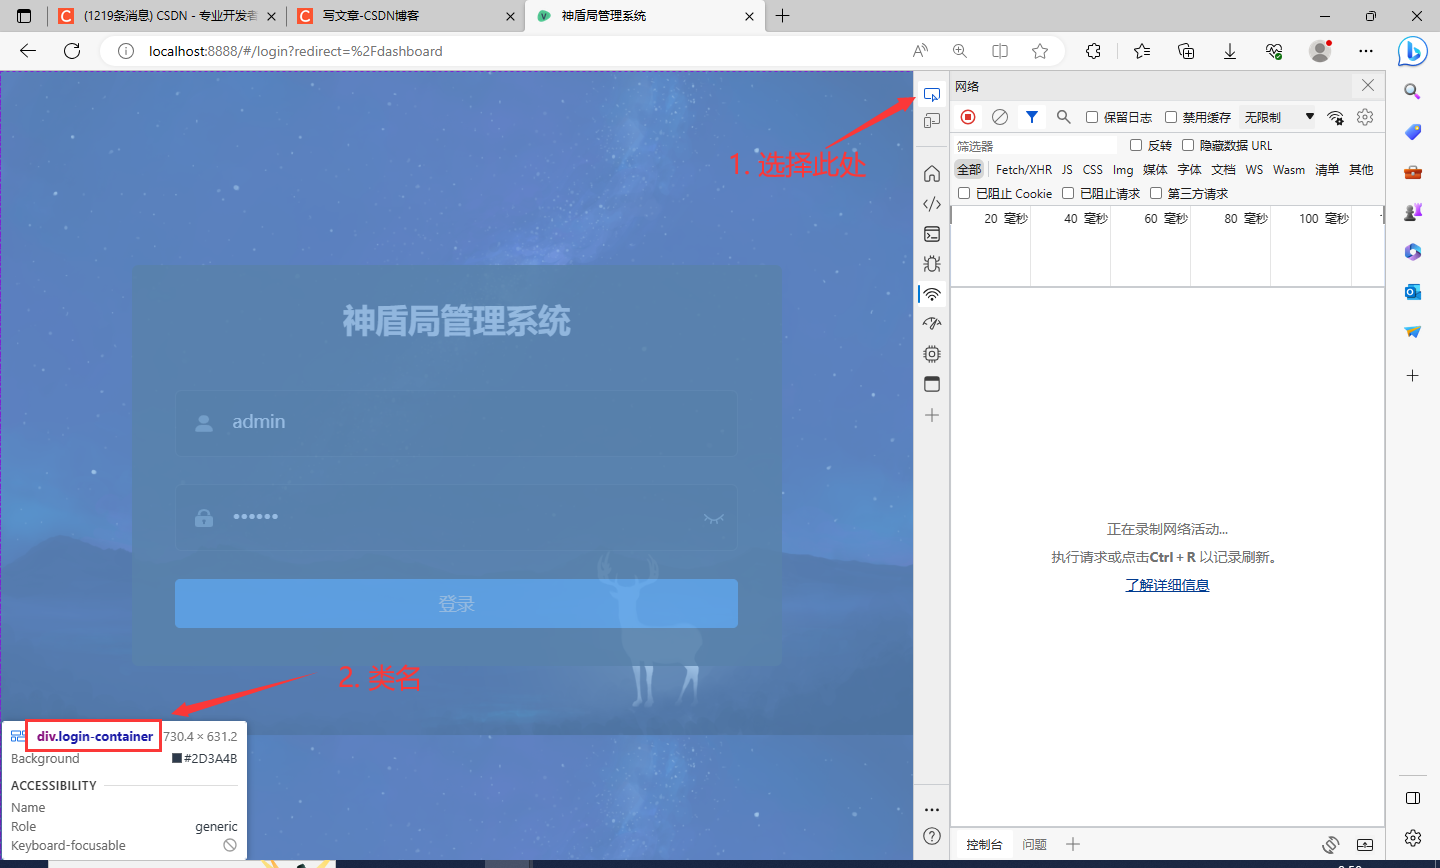
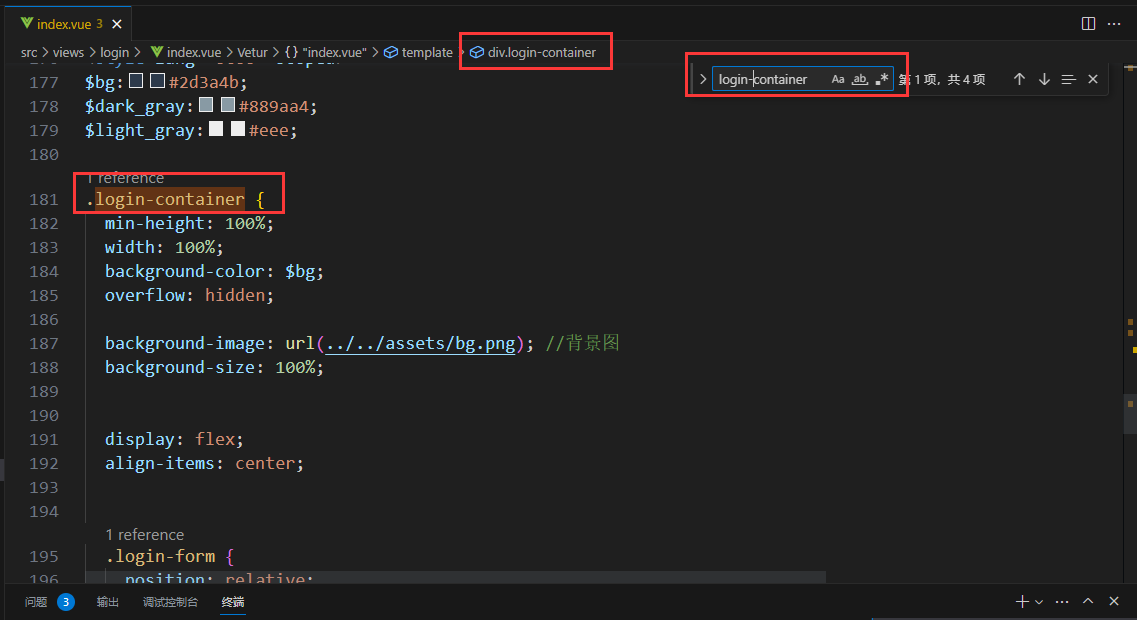
保存后页面会同步修改 为什么要在此处才能修改背景图? 我们在浏览器中按F12打开开发者模式,选择1,然后鼠标移动到整个页面都被选择,此时左下角出现了一个类名.login.container,记住该名称 打开VScode搜索.login-container ,注意页面显示的.login.container中第二个.替换为-变为.login-container,此处就是我们需要修改的样式的地方 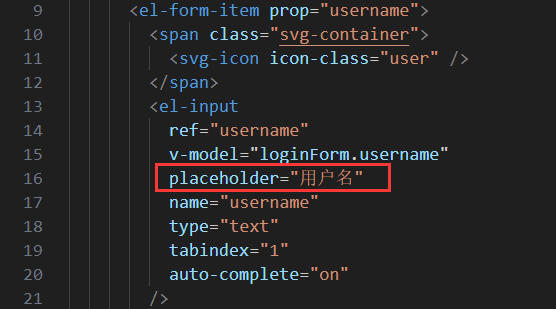 修改登录表单为半透明,同样查找元素然后搜索login-form 修改登录表单为半透明,同样查找元素然后搜索login-form 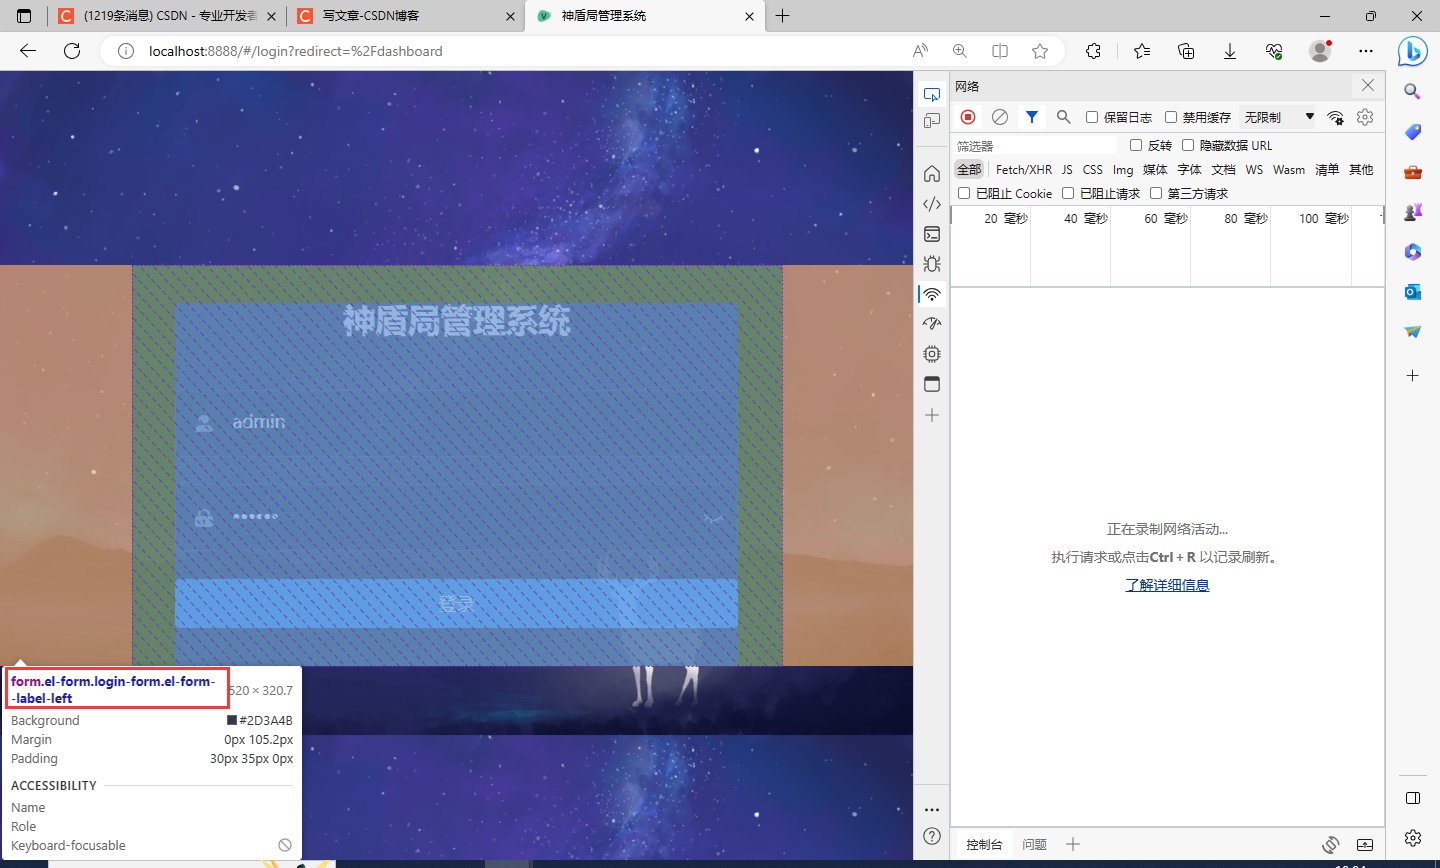 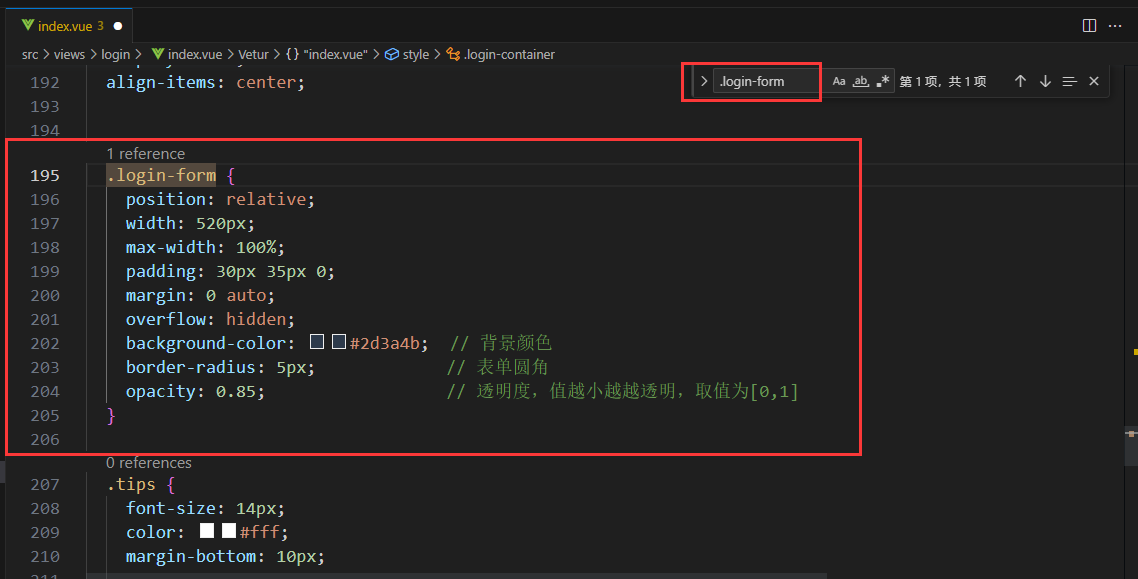 .login-form {
position: relative;
width: 520px;
max-width: 100%;
padding: 30px 35px 0;
margin: 0 auto;
overflow: hidden;
background-color: #2d3a4b; // 背景颜色
border-radius: 5px; // 表单圆角
opacity: 0.85; // 透明度,值越小越越透明,取值为[0,1]
}
附上我的src\views\login\inde.vue文件的全部代码
神盾局管理系统
登录
import { validUsername } from '@/utils/validate'
export default {
name: 'Login',
data() {
const validateUsername = (rule, value, callback) => {
if (!validUsername(value)) {
callback(new Error('请输入正确的用户名'))
} else {
callback()
}
}
const validatePassword = (rule, value, callback) => {
if (value.length
callback()
}
}
return {
loginForm: {
username: 'admin',
password: '123456'
},
loginRules: {
username: [{ required: true, trigger: 'blur', validator: validateUsername }],
password: [{ required: true, trigger: 'blur', validator: validatePassword }]
},
loading: false,
passwordType: 'password',
redirect: undefined
}
},
watch: {
$route: {
handler: function(route) {
this.redirect = route.query && route.query.redirect
},
immediate: true
}
},
methods: {
showPwd() {
if (this.passwordType === 'password') {
this.passwordType = ''
} else {
this.passwordType = 'password'
}
this.$nextTick(() => {
this.$refs.password.focus()
})
},
handleLogin() {
this.$refs.loginForm.validate(valid => {
if (valid) {
this.loading = true
this.$store.dispatch('user/login', this.loginForm).then(() => {
this.$router.push({ path: this.redirect || '/' })
this.loading = false
}).catch(() => {
this.loading = false
})
} else {
console.log('error submit!!')
return false
}
})
}
}
}
/* 修复input 背景不协调 和光标变色 */
/* Detail see https://github.com/PanJiaChen/vue-element-admin/pull/927 */
$bg:#283443;
$light_gray:#fff;
$cursor: #fff;
@supports (-webkit-mask: none) and (not (cater-color: $cursor)) {
.login-container .el-input input {
color: $cursor;
}
}
/* reset element-ui css */
.login-container {
.el-input {
display: inline-block;
height: 47px;
width: 85%;
input {
background: transparent;
border: 0px;
-webkit-appearance: none;
border-radius: 0px;
padding: 12px 5px 12px 15px;
color: $light_gray;
height: 47px;
caret-color: $cursor;
&:-webkit-autofill {
box-shadow: 0 0 0px 1000px $bg inset !important;
-webkit-text-fill-color: $cursor !important;
}
}
}
.el-form-item {
border: 1px solid rgba(255, 255, 255, 0.1);
background: rgba(0, 0, 0, 0.1);
border-radius: 5px;
color: #454545;
}
}
$bg:#2d3a4b;
$dark_gray:#889aa4;
$light_gray:#eee;
.login-container {
min-height: 100%;
width: 100%;
background-color: $bg;
overflow: hidden;
background-image: url(../../assets/bg.png); //背景图
background-size: 100%;
display: flex;
align-items: center;
.login-form {
position: relative;
width: 520px;
max-width: 100%;
padding: 30px 35px 0;
margin: 0 auto;
overflow: hidden;
background-color: #2d3a4b; // 背景颜色
border-radius: 5px; // 表单圆角
opacity: 0.85; // 透明度,值越小越越透明,取值为[0,1]
}
.tips {
font-size: 14px;
color: #fff;
margin-bottom: 10px;
span {
&:first-of-type {
margin-right: 16px;
}
}
}
.svg-container {
padding: 6px 5px 6px 15px;
color: $dark_gray;
vertical-align: middle;
width: 30px;
display: inline-block;
}
.title-container {
position: relative;
.title {
font-size: 26px;
color: $light_gray;
margin: 0px auto 40px auto;
text-align: center;
font-weight: bold;
}
}
.show-pwd {
position: absolute;
right: 10px;
top: 7px;
font-size: 16px;
color: $dark_gray;
cursor: pointer;
user-select: none;
}
}
复制代码后注意背景图的链接地址下要有文件存在 .login-form {
position: relative;
width: 520px;
max-width: 100%;
padding: 30px 35px 0;
margin: 0 auto;
overflow: hidden;
background-color: #2d3a4b; // 背景颜色
border-radius: 5px; // 表单圆角
opacity: 0.85; // 透明度,值越小越越透明,取值为[0,1]
}
附上我的src\views\login\inde.vue文件的全部代码
神盾局管理系统
登录
import { validUsername } from '@/utils/validate'
export default {
name: 'Login',
data() {
const validateUsername = (rule, value, callback) => {
if (!validUsername(value)) {
callback(new Error('请输入正确的用户名'))
} else {
callback()
}
}
const validatePassword = (rule, value, callback) => {
if (value.length
callback()
}
}
return {
loginForm: {
username: 'admin',
password: '123456'
},
loginRules: {
username: [{ required: true, trigger: 'blur', validator: validateUsername }],
password: [{ required: true, trigger: 'blur', validator: validatePassword }]
},
loading: false,
passwordType: 'password',
redirect: undefined
}
},
watch: {
$route: {
handler: function(route) {
this.redirect = route.query && route.query.redirect
},
immediate: true
}
},
methods: {
showPwd() {
if (this.passwordType === 'password') {
this.passwordType = ''
} else {
this.passwordType = 'password'
}
this.$nextTick(() => {
this.$refs.password.focus()
})
},
handleLogin() {
this.$refs.loginForm.validate(valid => {
if (valid) {
this.loading = true
this.$store.dispatch('user/login', this.loginForm).then(() => {
this.$router.push({ path: this.redirect || '/' })
this.loading = false
}).catch(() => {
this.loading = false
})
} else {
console.log('error submit!!')
return false
}
})
}
}
}
/* 修复input 背景不协调 和光标变色 */
/* Detail see https://github.com/PanJiaChen/vue-element-admin/pull/927 */
$bg:#283443;
$light_gray:#fff;
$cursor: #fff;
@supports (-webkit-mask: none) and (not (cater-color: $cursor)) {
.login-container .el-input input {
color: $cursor;
}
}
/* reset element-ui css */
.login-container {
.el-input {
display: inline-block;
height: 47px;
width: 85%;
input {
background: transparent;
border: 0px;
-webkit-appearance: none;
border-radius: 0px;
padding: 12px 5px 12px 15px;
color: $light_gray;
height: 47px;
caret-color: $cursor;
&:-webkit-autofill {
box-shadow: 0 0 0px 1000px $bg inset !important;
-webkit-text-fill-color: $cursor !important;
}
}
}
.el-form-item {
border: 1px solid rgba(255, 255, 255, 0.1);
background: rgba(0, 0, 0, 0.1);
border-radius: 5px;
color: #454545;
}
}
$bg:#2d3a4b;
$dark_gray:#889aa4;
$light_gray:#eee;
.login-container {
min-height: 100%;
width: 100%;
background-color: $bg;
overflow: hidden;
background-image: url(../../assets/bg.png); //背景图
background-size: 100%;
display: flex;
align-items: center;
.login-form {
position: relative;
width: 520px;
max-width: 100%;
padding: 30px 35px 0;
margin: 0 auto;
overflow: hidden;
background-color: #2d3a4b; // 背景颜色
border-radius: 5px; // 表单圆角
opacity: 0.85; // 透明度,值越小越越透明,取值为[0,1]
}
.tips {
font-size: 14px;
color: #fff;
margin-bottom: 10px;
span {
&:first-of-type {
margin-right: 16px;
}
}
}
.svg-container {
padding: 6px 5px 6px 15px;
color: $dark_gray;
vertical-align: middle;
width: 30px;
display: inline-block;
}
.title-container {
position: relative;
.title {
font-size: 26px;
color: $light_gray;
margin: 0px auto 40px auto;
text-align: center;
font-weight: bold;
}
}
.show-pwd {
position: absolute;
right: 10px;
top: 7px;
font-size: 16px;
color: $dark_gray;
cursor: pointer;
user-select: none;
}
}
复制代码后注意背景图的链接地址下要有文件存在
修改 页面标签 找到src\settings.js文件,然后修改第3行title
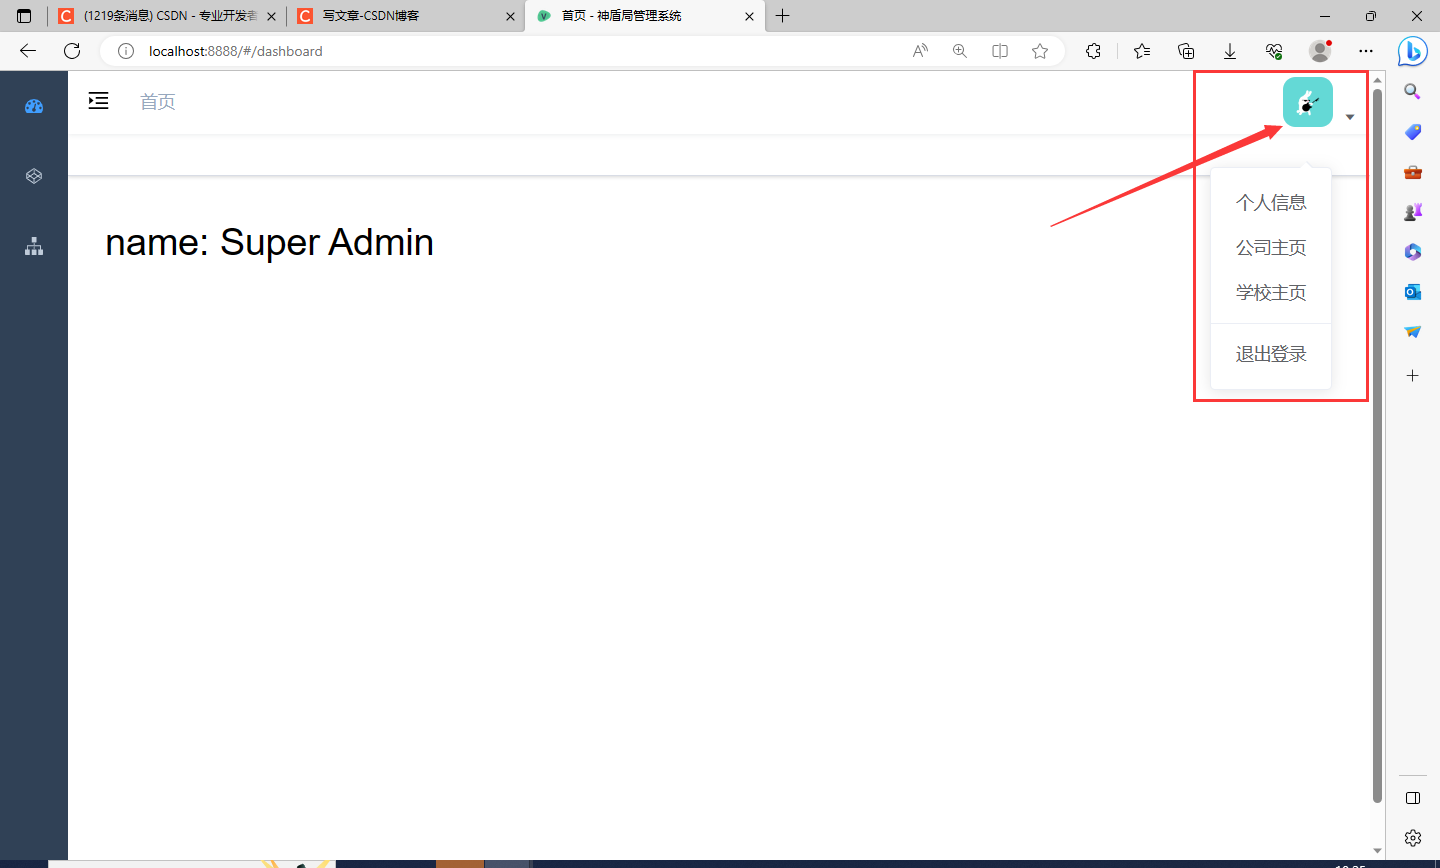
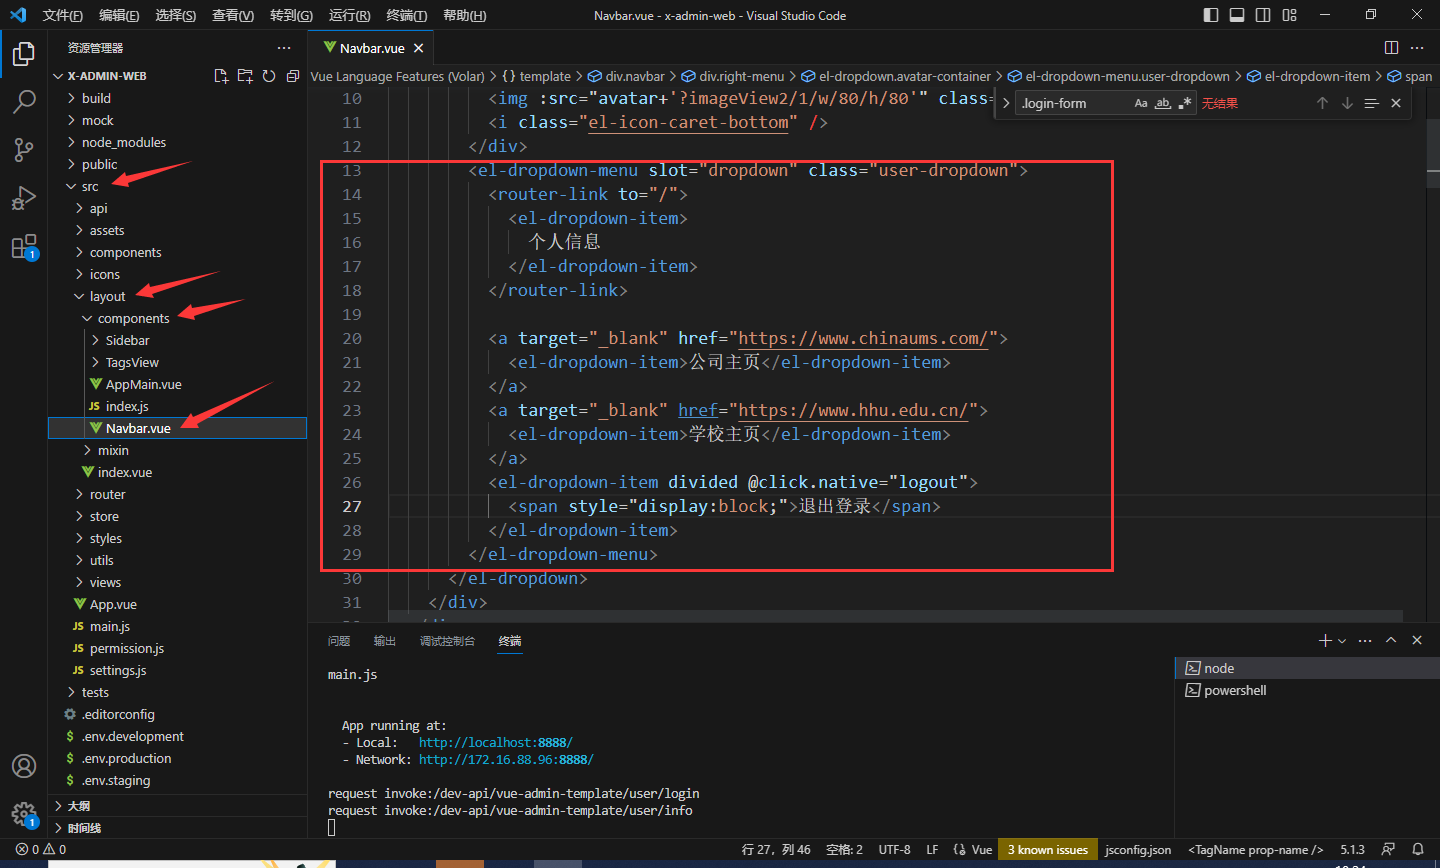
修改完毕后浏览器标签会改变 点击此处会有导航窗口 可自定义修改,找到scr\layout\components\Navbar.vue文件,修改红框处的代码
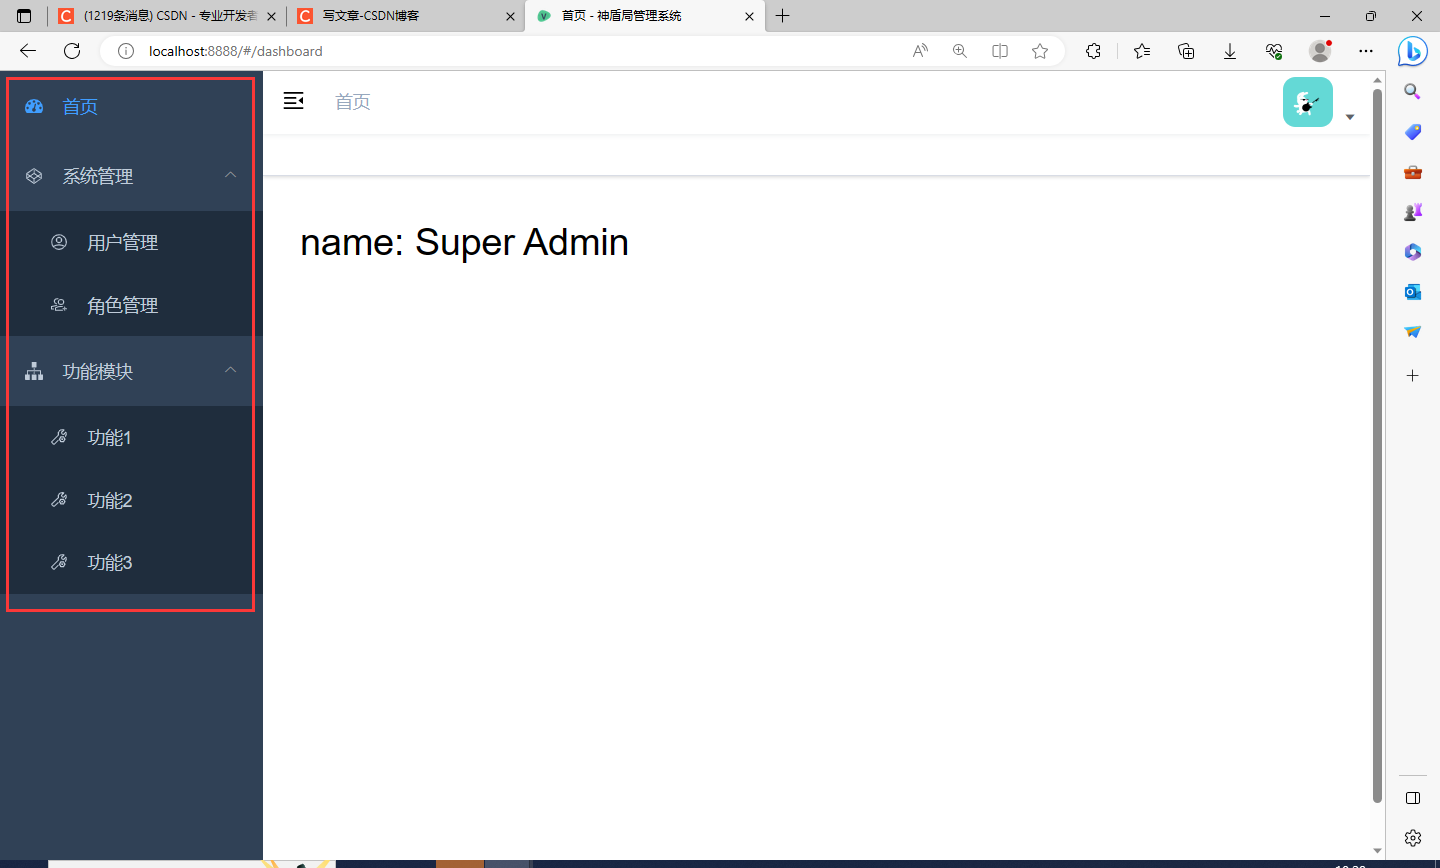
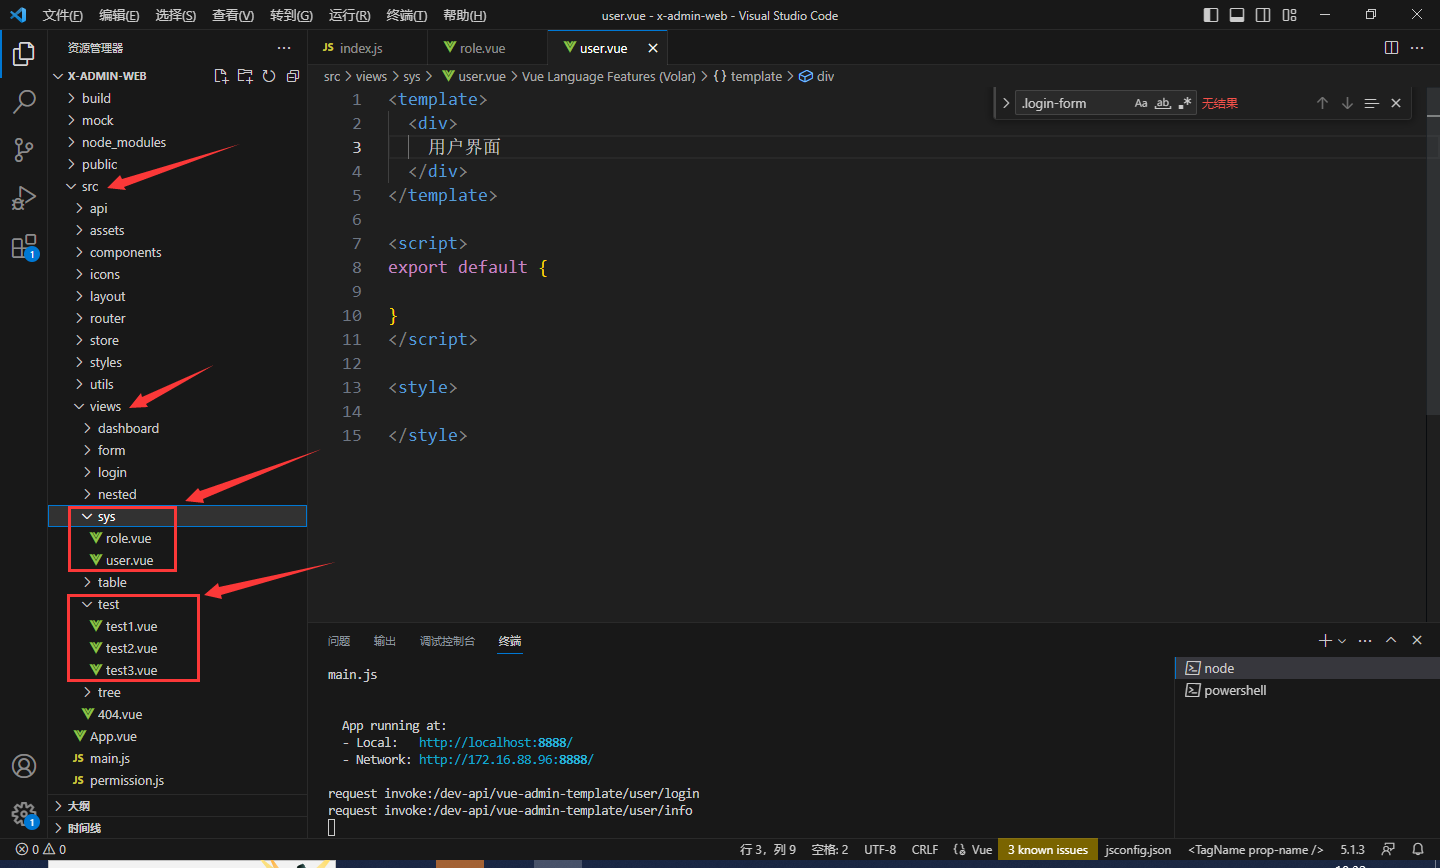
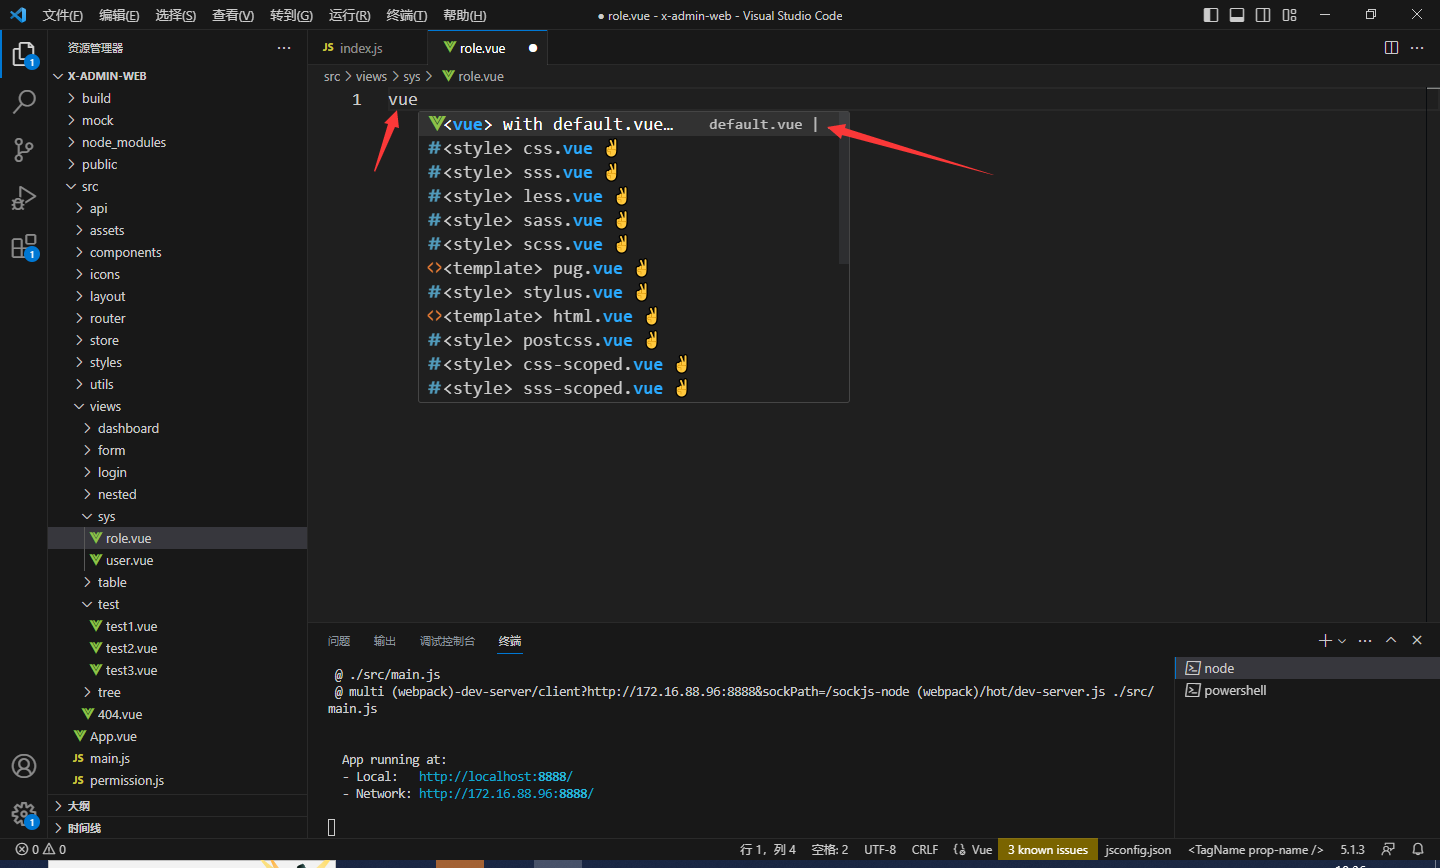
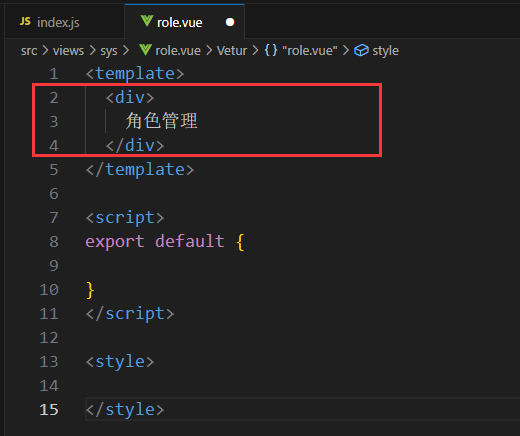
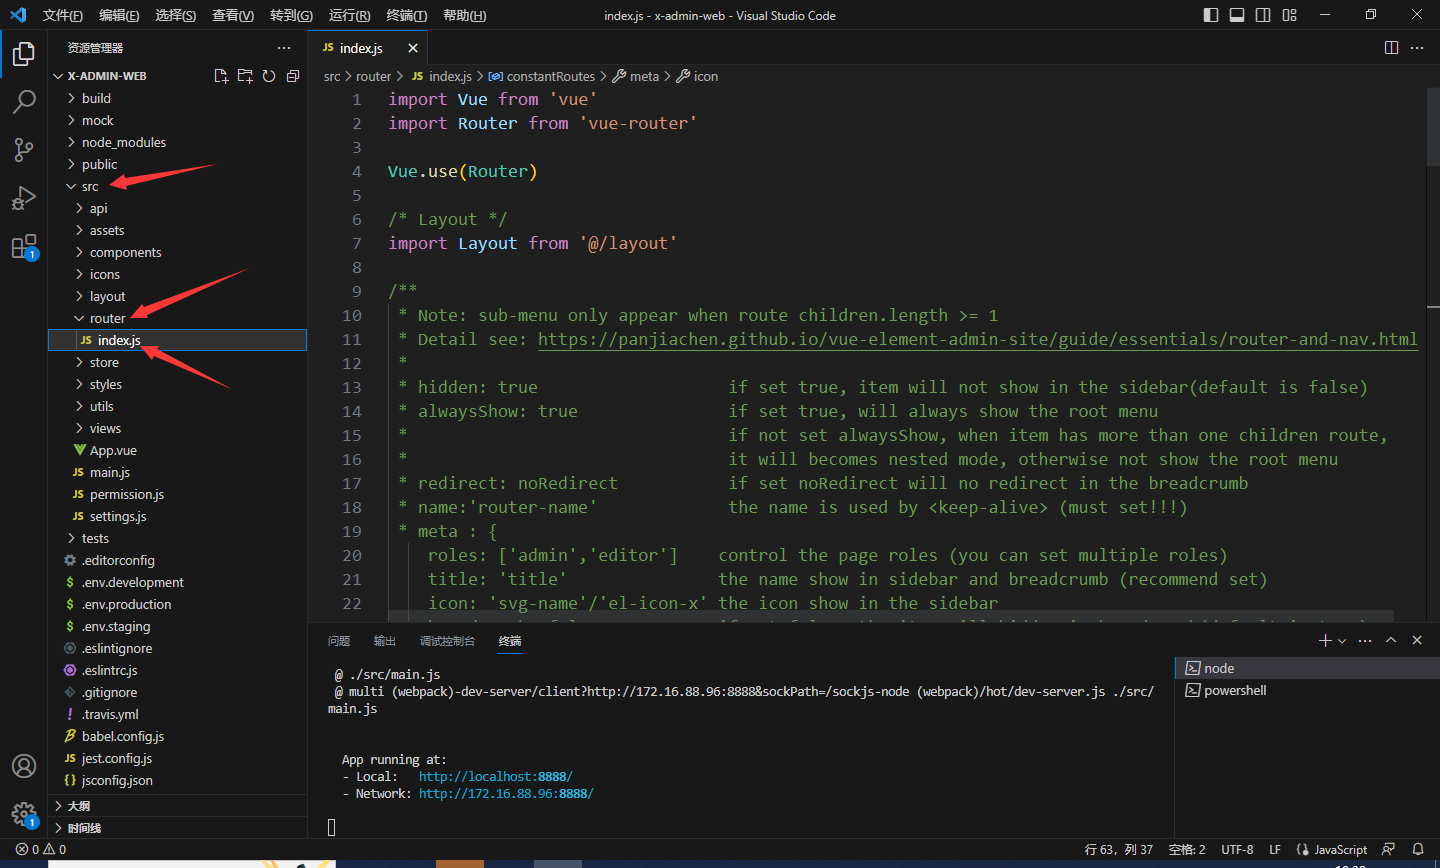
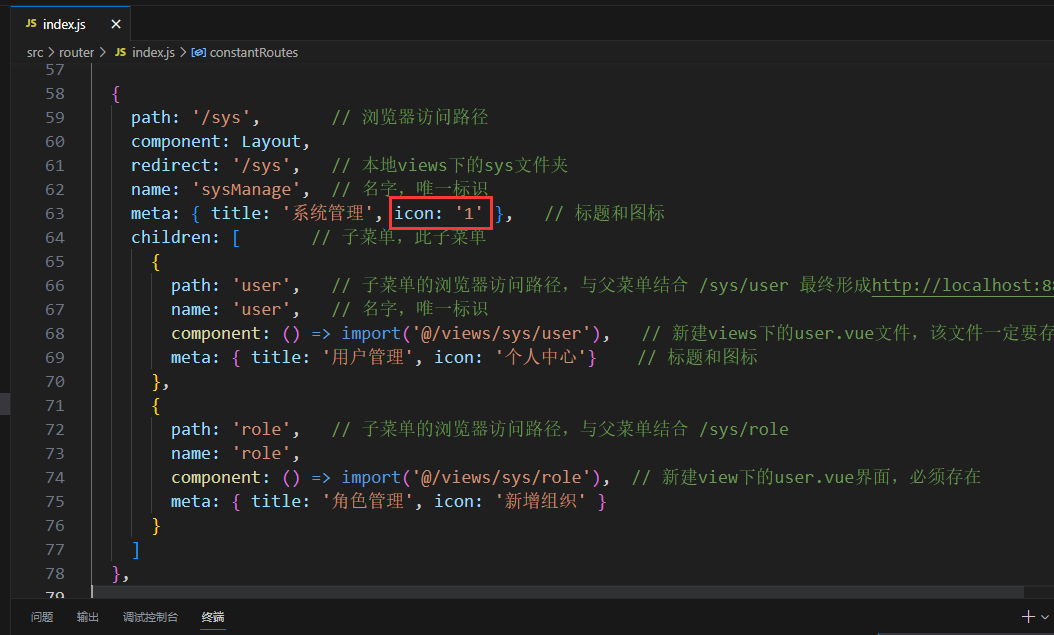
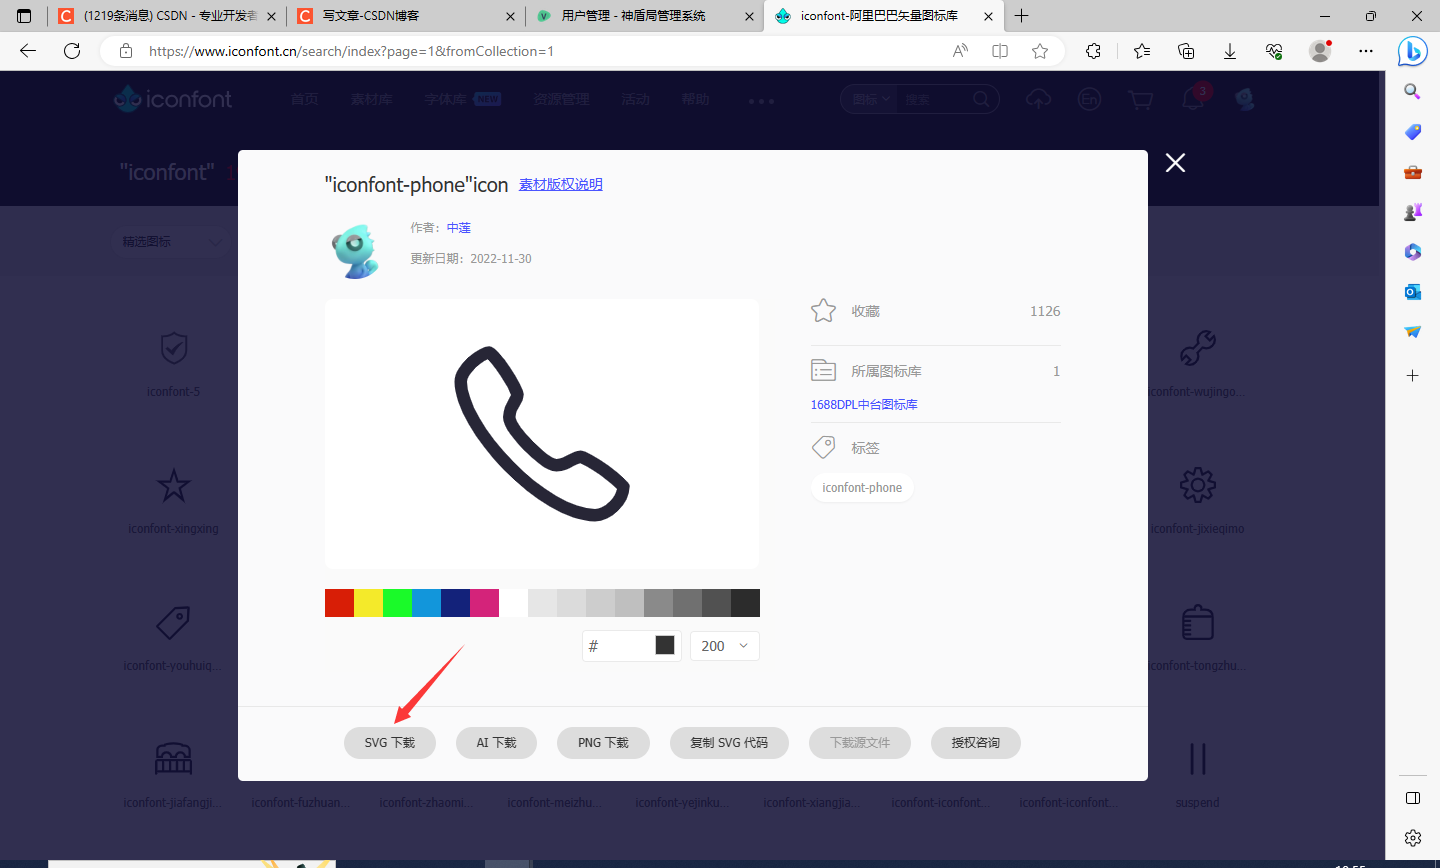
首先,在src\views\下新建文件夹sys和test,然后再分别在这两个文件夹中新建role.vue、user.vue、test1.vue、test2.vue、test3.vue文件,如下图所示 进入role.vue写代码 在VScode中输入vue会自动代码提示(需在VScode中安装vue插件),回车即可 会自动生成模板 此时写上一些代码 其他新建的vue文件如法炮制 然后我们在src\router\index.js中路由链接这些新建的vue文件 新增代码及注释 { path: '/sys', // 浏览器访问路径 component: Layout, redirect: '/sys', // 本地views下的sys文件夹 name: 'sysManage', // 名字,唯一标识 meta: { title: '系统管理', icon: '1' }, // 标题和图标 children: [ // 子菜单 { path: 'user', // 子菜单的浏览器访问路径,与父菜单结合 /sys/user 最终形成http://localhost:8888/#/sys/user name: 'user', // 名字,唯一标识 component: () => import('@/views/sys/user'), // 新建views下的user.vue文件,该文件一定要存在 meta: { title: '用户管理', icon: '个人中心'} // 标题和图标 }, { path: 'role', // 子菜单的浏览器访问路径,与父菜单结合 /sys/role name: 'role', component: () => import('@/views/sys/role'), // 新建view下的user.vue界面,必须存在 meta: { title: '角色管理', icon: '新增组织' } } ] },注意该代码中的icon:'1',这是自定义的图标,可在阿里巴巴矢量图标库中下载自己喜欢的图标
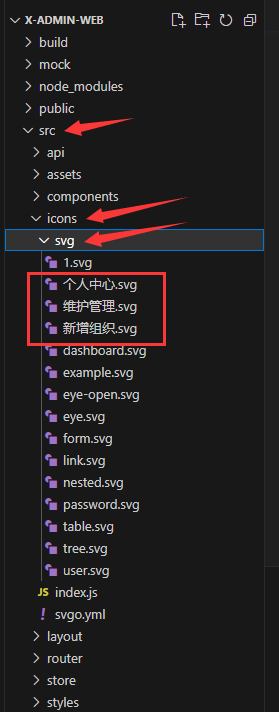
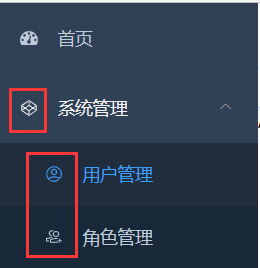
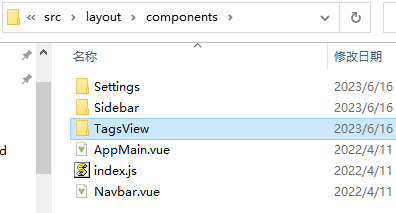
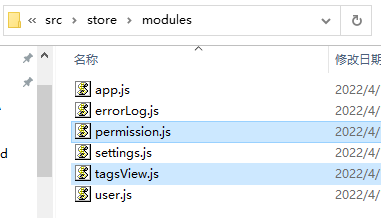
找到喜欢的图标后点击SVG下载 下好的图标重命名后保存在src\icons\svg文件夹中 然后就可以在代码中用上该图标了,不用写路径和后缀名 图标效果如下 我的src\router\index.js全部代码 import Vue from 'vue' import Router from 'vue-router' Vue.use(Router) /* Layout */ import Layout from '@/layout' /** * Note: sub-menu only appear when route children.length >= 1 * Detail see: https://panjiachen.github.io/vue-element-admin-site/guide/essentials/router-and-nav.html * * hidden: true if set true, item will not show in the sidebar(default is false) * alwaysShow: true if set true, will always show the root menu * if not set alwaysShow, when item has more than one children route, * it will becomes nested mode, otherwise not show the root menu * redirect: noRedirect if set noRedirect will no redirect in the breadcrumb * name:'router-name' the name is used by (must set!!!) * meta : { roles: ['admin','editor'] control the page roles (you can set multiple roles) title: 'title' the name show in sidebar and breadcrumb (recommend set) icon: 'svg-name'/'el-icon-x' the icon show in the sidebar breadcrumb: false if set false, the item will hidden in breadcrumb(default is true) activeMenu: '/example/list' if set path, the sidebar will highlight the path you set } */ /** * constantRoutes * a base page that does not have permission requirements * all roles can be accessed */ export const constantRoutes = [ { path: '/login', component: () => import('@/views/login/index'), hidden: true }, { path: '/404', component: () => import('@/views/404'), hidden: true }, { path: '/', component: Layout, redirect: '/dashboard', children: [{ path: 'dashboard', name: 'Dashboard', component: () => import('@/views/dashboard/index'), meta: { title: '首页', icon: 'dashboard' , affix:true} }] }, { path: '/sys', // 浏览器访问路径 component: Layout, redirect: '/sys', // 本地views下的sys文件夹 name: 'sysManage', // 名字,唯一标识 meta: { title: '系统管理', icon: '1' }, // 标题和图标 children: [ // 子菜单,此子菜单 { path: 'user', // 子菜单的浏览器访问路径,与父菜单结合 /sys/user 最终形成http://localhost:8888/#/sys/user name: 'user', // 名字,唯一标识 component: () => import('@/views/sys/user'), // 新建views下的user.vue文件,该文件一定要存在 meta: { title: '用户管理', icon: '个人中心'} // 标题和图标 }, { path: 'role', // 子菜单的浏览器访问路径,与父菜单结合 /sys/role name: 'role', component: () => import('@/views/sys/role'), // 新建view下的user.vue界面,必须存在 meta: { title: '角色管理', icon: '新增组织' } } ] }, { path: '/test', component: Layout, redirect: '/test', name: 'test', meta: { title: '功能模块', icon: 'tree' }, children: [ //子菜单 { path: 'test1', name: 'test1', component: () => import('@/views/test/test1'), // 新建view下的user.vue界面 meta: { title: '功能1', icon: '维护管理' } }, { path: 'test2', name: 'test2', component: () => import('@/views/test/test2'), // 新建view下的user.vue界面,必须存在 meta: { title: '功能2', icon: '维护管理' } }, { path: 'test3', name: 'test3', component: () => import('@/views/test/test3'), // 新建view下的user.vue界面,必须存在 meta: { title: '功能3', icon: '维护管理' } } ] }, // 404 page must be placed at the end !!! { path: '*', redirect: '/404', hidden: true } ] const createRouter = () => new Router({ // mode: 'history', // require service support scrollBehavior: () => ({ y: 0 }), routes: constantRoutes }) const router = createRouter() // Detail see: https://github.com/vuejs/vue-router/issues/1234#issuecomment-357941465 export function resetRouter() { const newRouter = createRouter() router.matcher = newRouter.matcher // reset router } export default router注意复制代码时,确认好自己的icon图标文件 增加导航标签功能如下图所示需要新增一个功能 此功能的代码在之前介绍的第一个项目中,现在需要将代码copy过来 下载好最新的一个压缩包后,解压缩,找到以下三个文件,注意这些文件复制到正在开发的项目中对应的路径中去,两个项目的路径设置是一样的 src/layout/components/TagsView src/store/modules/tagsView.js src/store/modules/permission.js
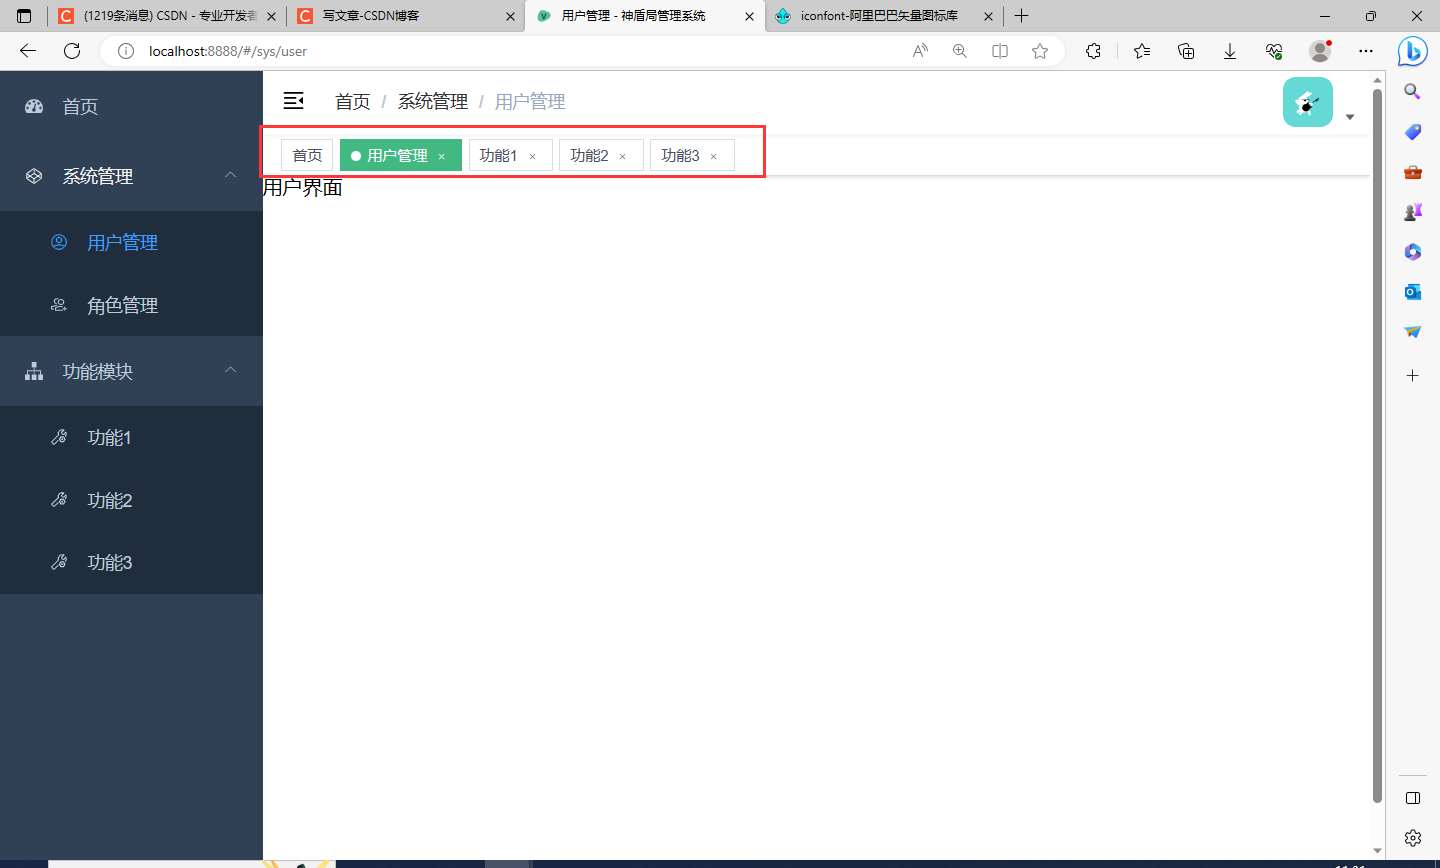
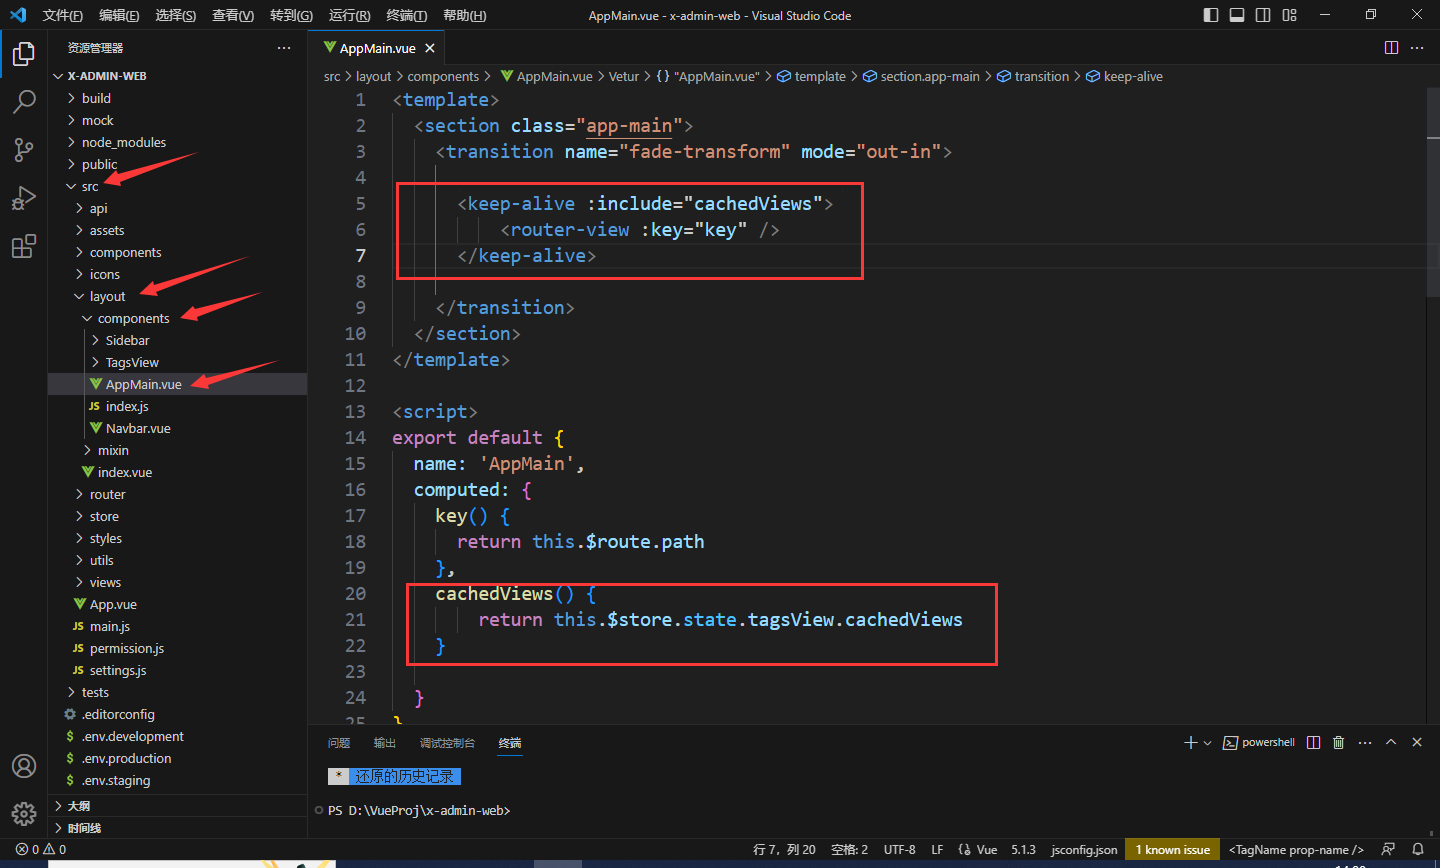
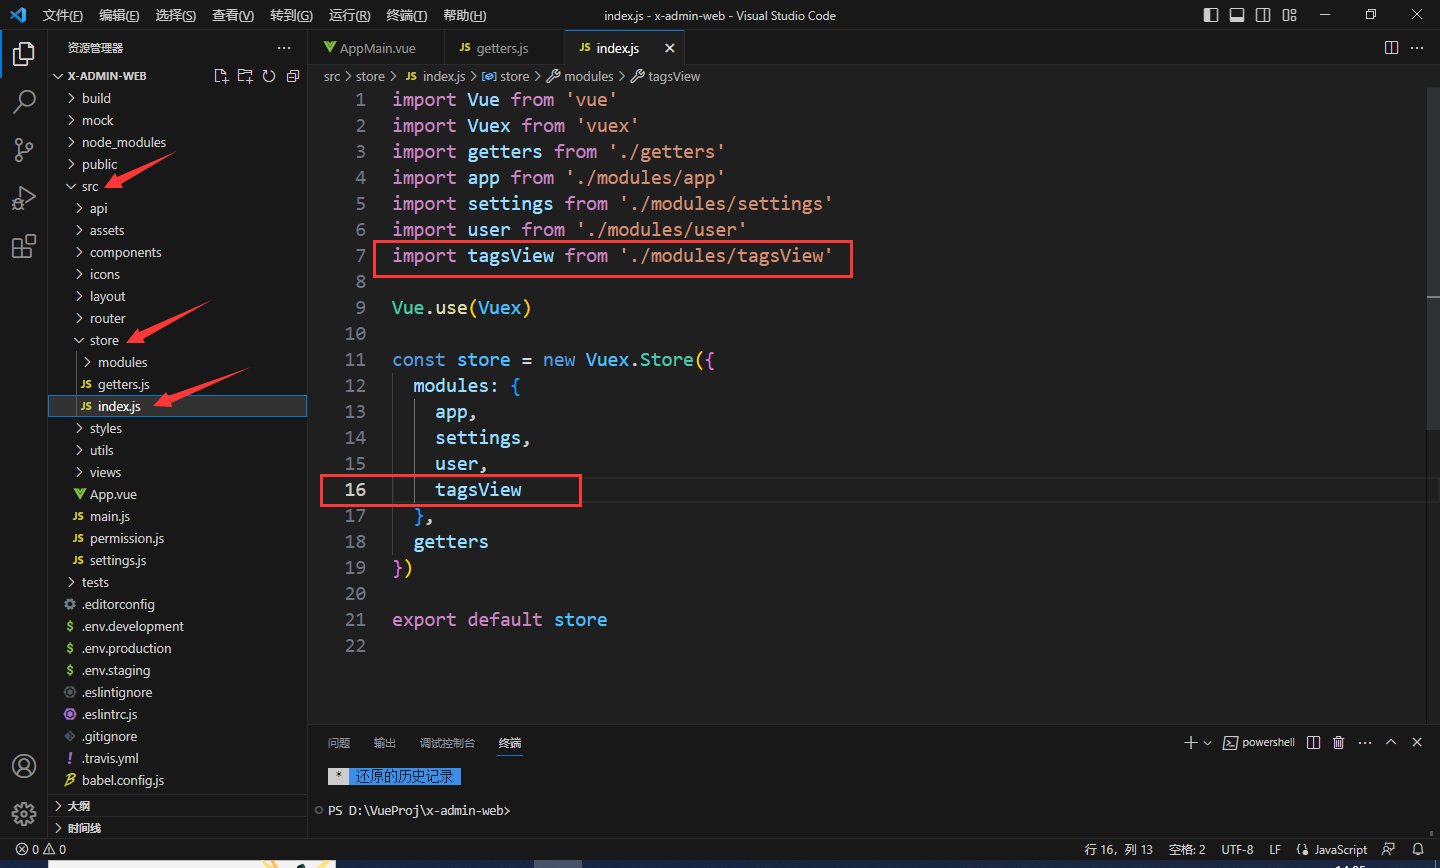
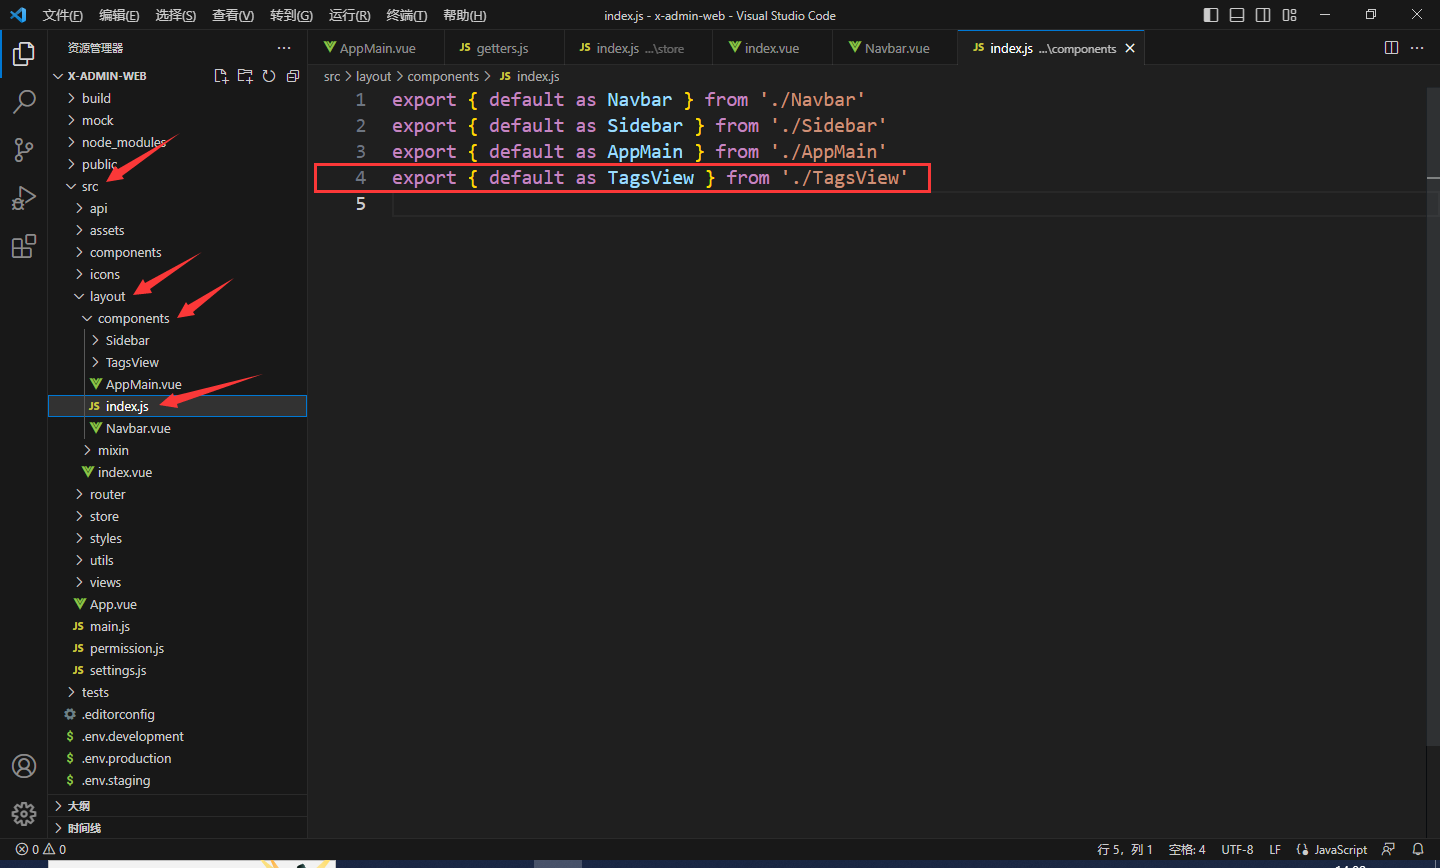
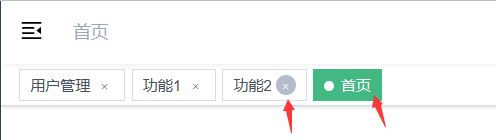
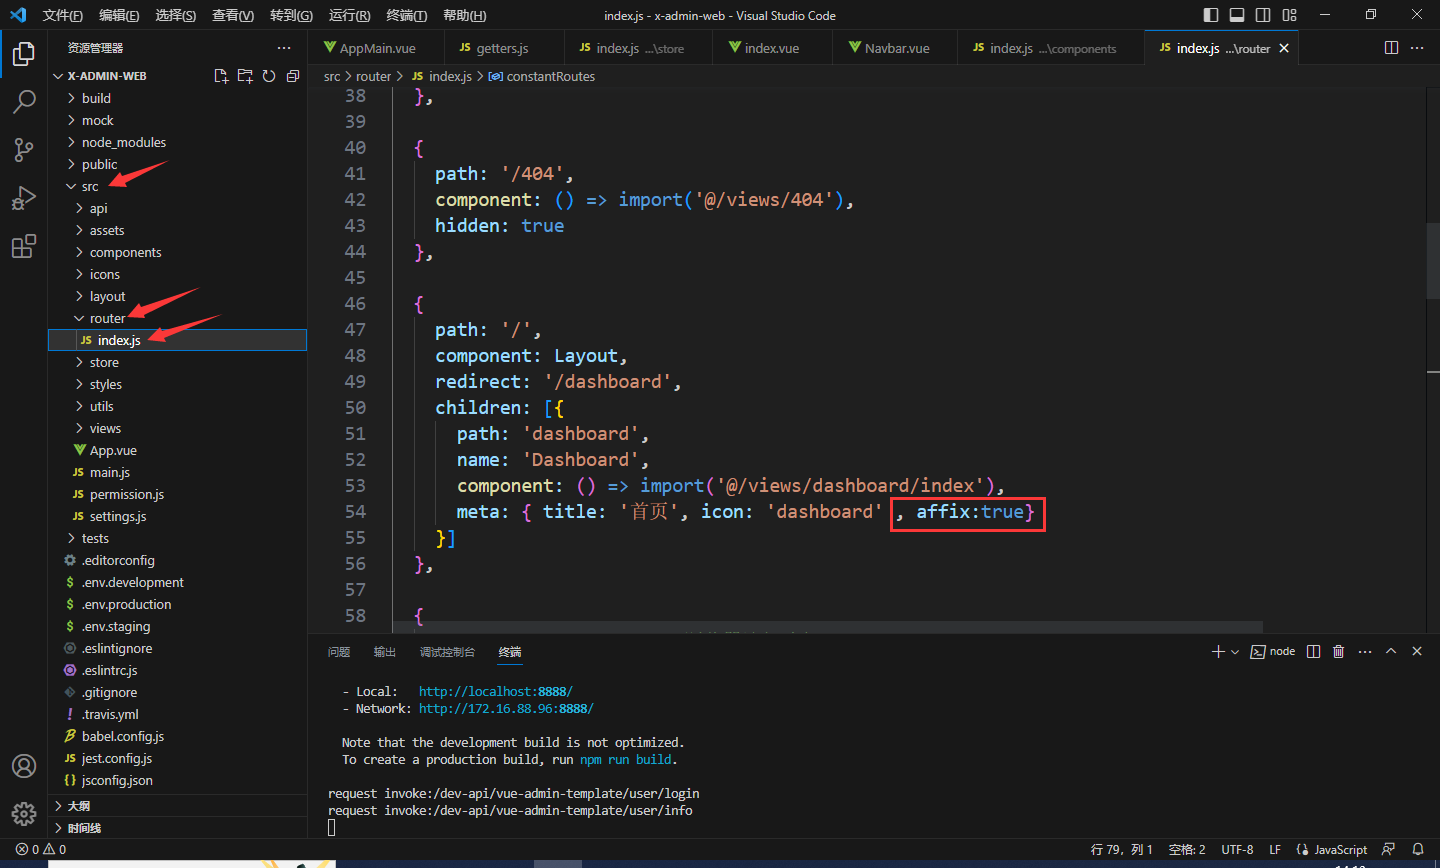
然后进入VScode中添加代码: 进入src/layout/components/AppMain.vue文件修改红框代码 修改文件src/store/getters.js 修改文件src/store/index.js 修改文件src\layout\index.vue 修改文件src\layout\components\index.js 大功告成!重新启动项目npm run dev 如果我们想要设置某个标签不可关闭,如下图中首页标签,此时需要在src\router\index.js文件中找到首页然后添加属性affix:true
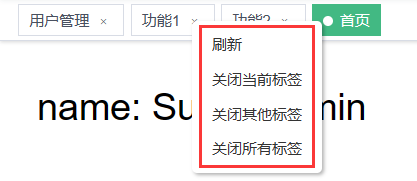
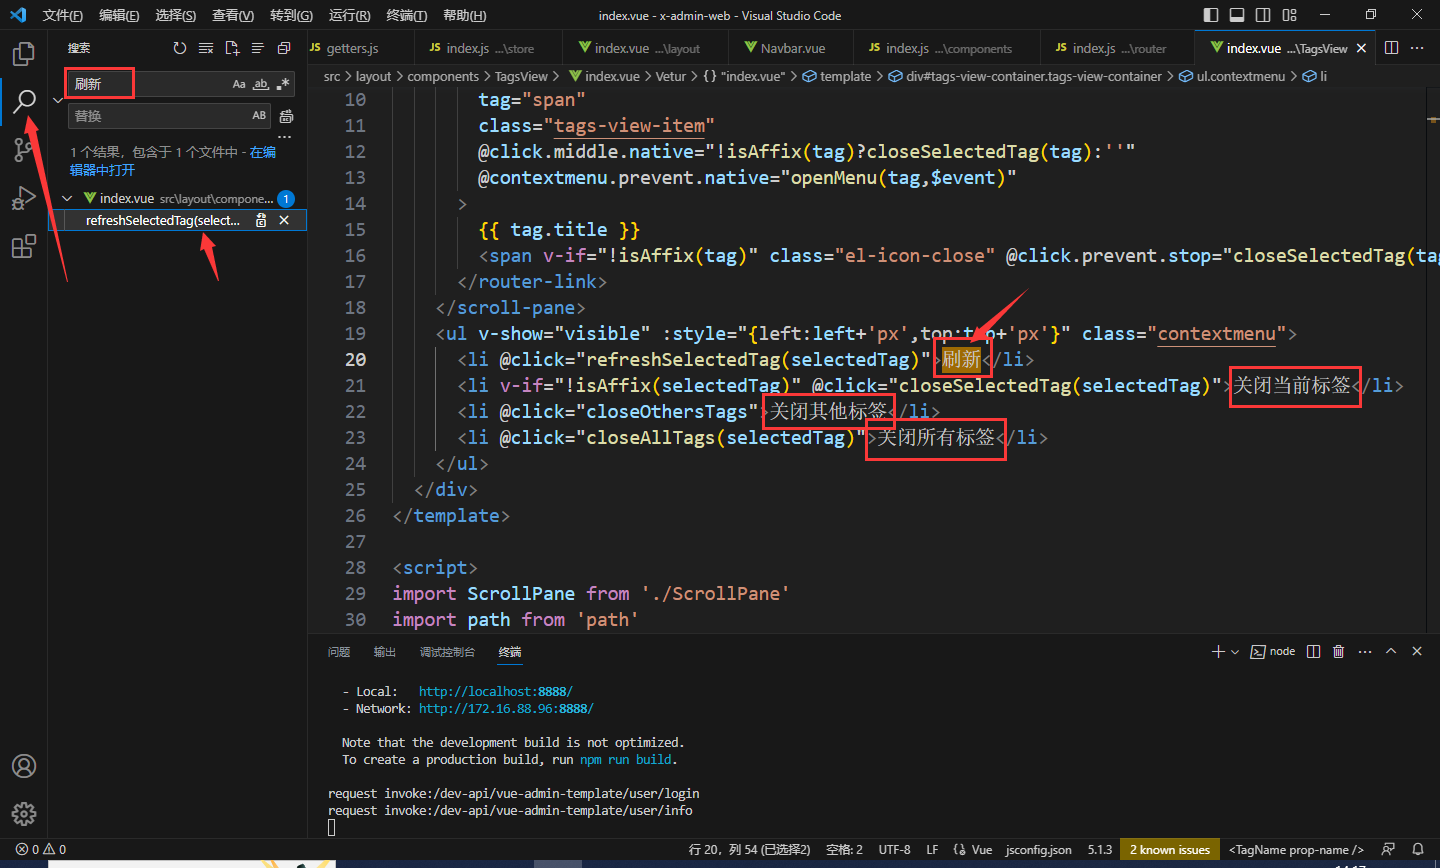
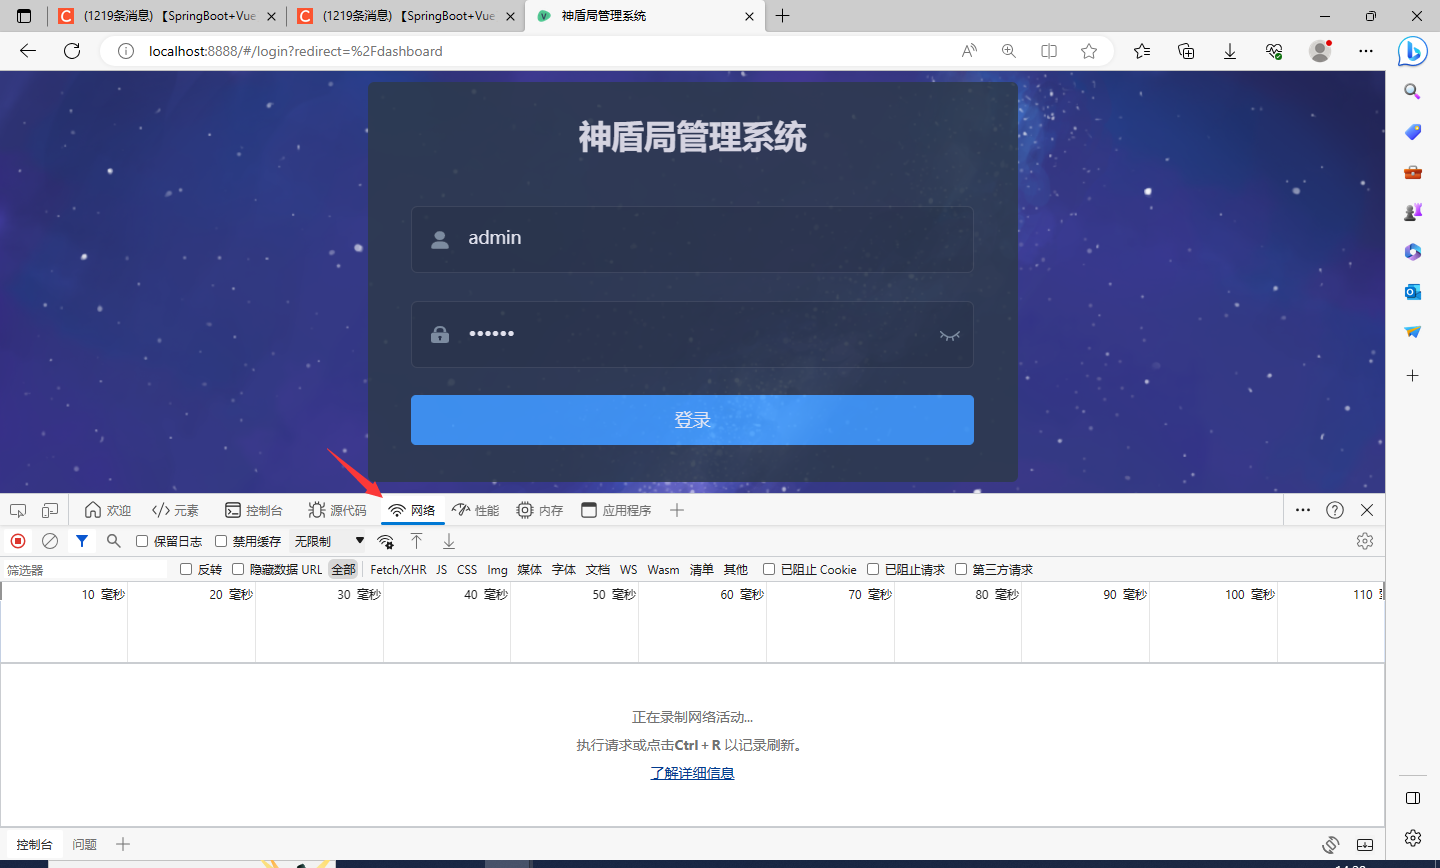
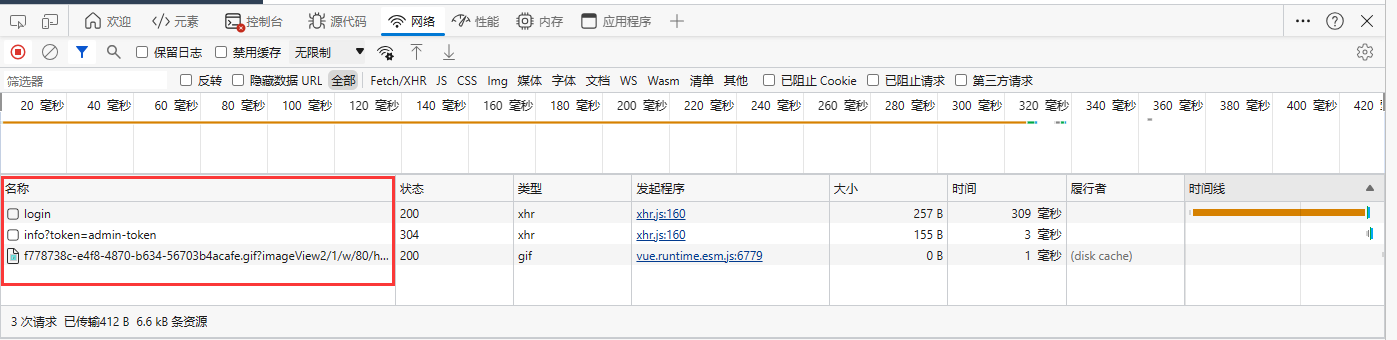
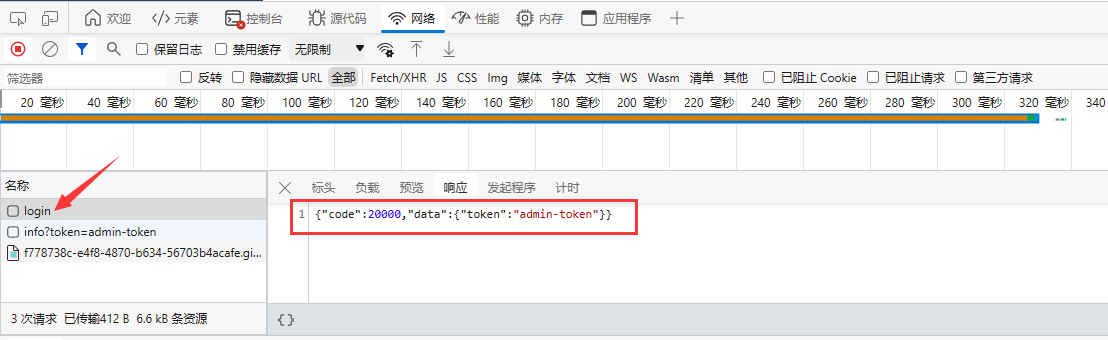
另外,标签导航是可以右击的,此处我将英文修改为了中文 大家可以在VScode中全局搜索浏览器弹出来的英文,然后查找,再将其修改为对应中文即可,此处修改路径为src\layout\components\TagsView\index.vue中第20行 此时前端页面修改就大差不差了 前端数据格式前后端对接需要知道前端登录的json数据传递格式 打开浏览器界面,按F12选择网络 然后点击登录,此时浏览器会记录状态 单击login会出现数据响应格式,如红框所示,这个格式后端写代码会用到 |
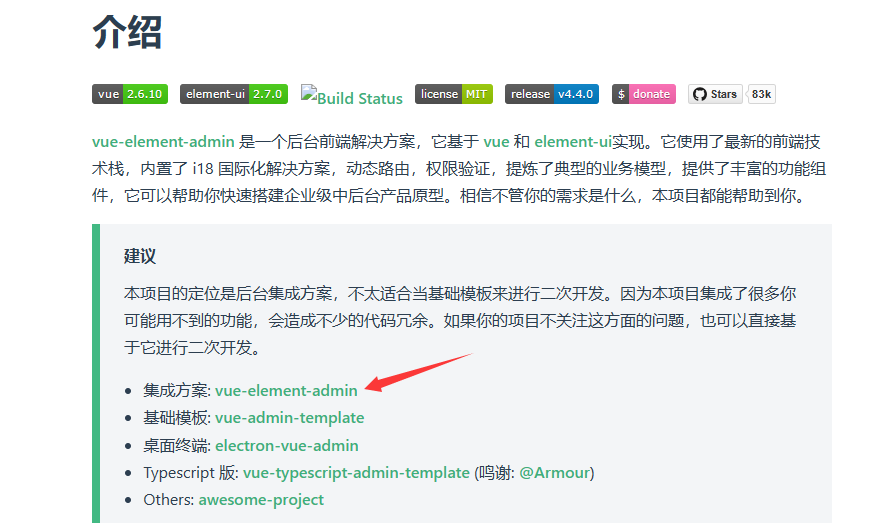
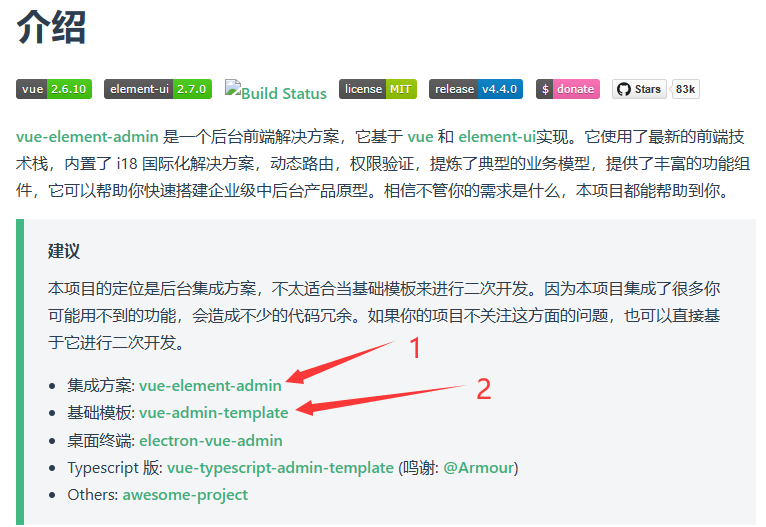 此处建议下载1和2,项目主要基于2开发,但是会拓展一个前端功能需要用到1里面的代码
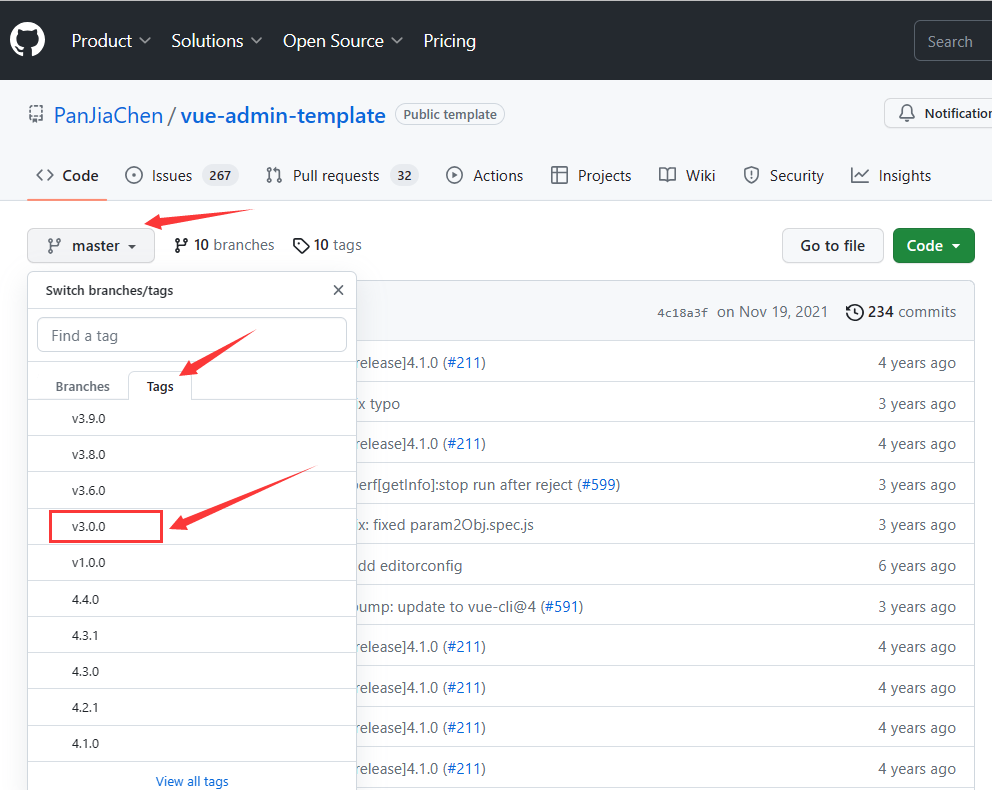
 打开链接即可


 其他的修改:
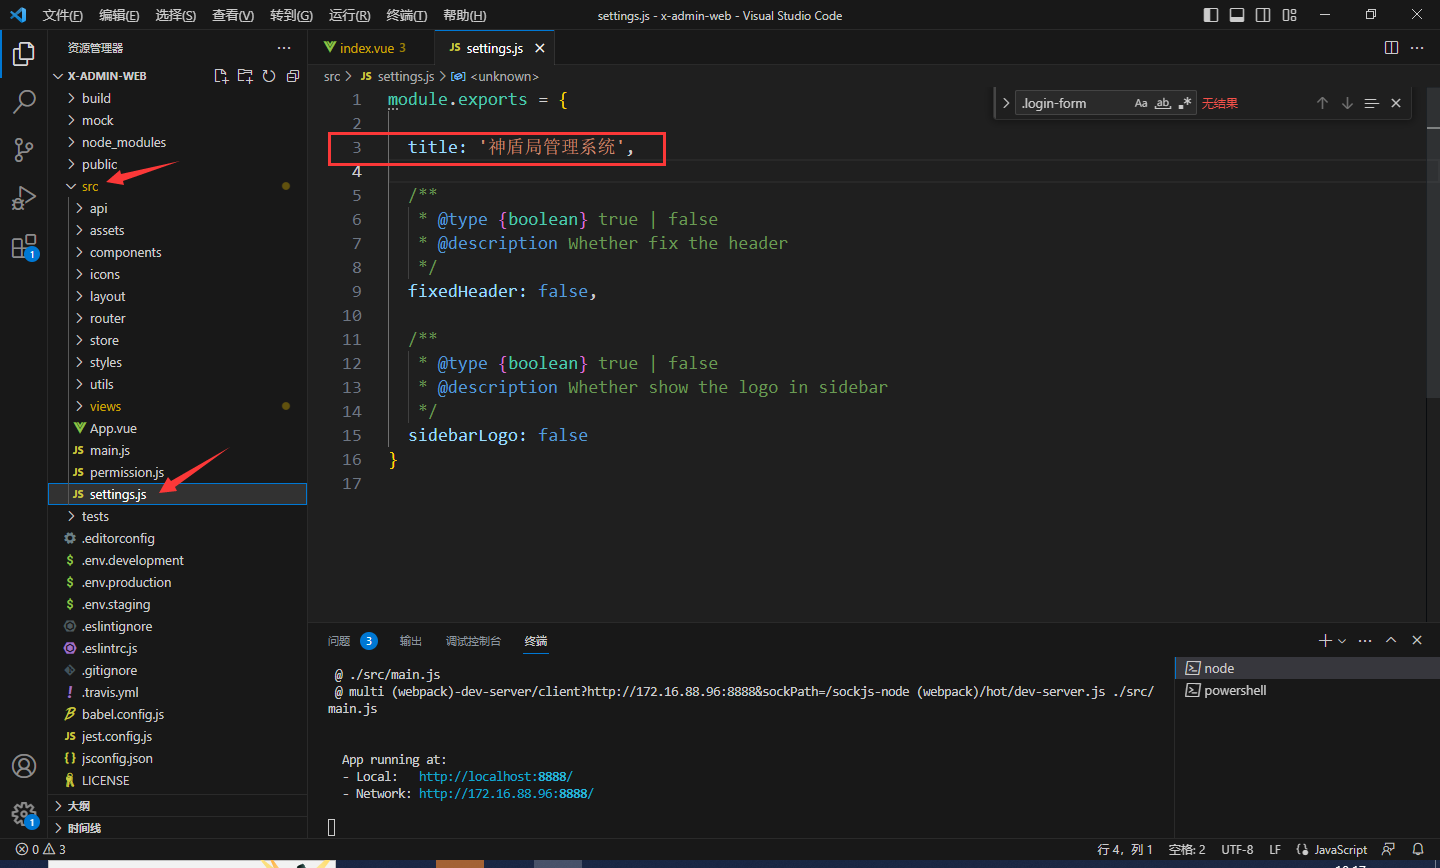


【本文地址】
今日新闻 |
推荐新闻 |